Create Internet Explorer add-on: C#, VB.NET, C++. How to
develop IE extension, toolbar, explorer bar, context menu
|
Add-in Express™
How to create IE add-onsAdd-in Express allows creating plug-ins for all versions of Internet Explorer, from IE 6 to IE 11, and makes Internet Explorer add-on development quick and easy. It implements everything required by the IE API; you focus on the application code only. Using visual designers of Add-in Express you can develop an Internet Explorer extension, add a custom button to the IE toolbar, build a custom Explorer bar, context menu item, or a pop-up item and add your command to the Internet Explorer interface with a few clicks. Just follow the steps below and you will see that Internet Explorer plugin development can be something you can enjoy:
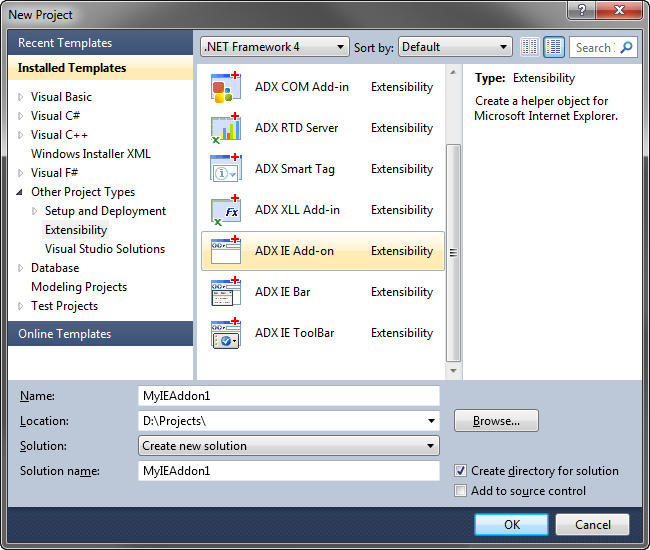
1. Create a new Internet Explorer add-on solutionIn your Visual Studio IDE, run the Add-in Express IE Add-on wizard located in the "Other Projects | Extensibility Projects" item of the "New Project" dialog box.
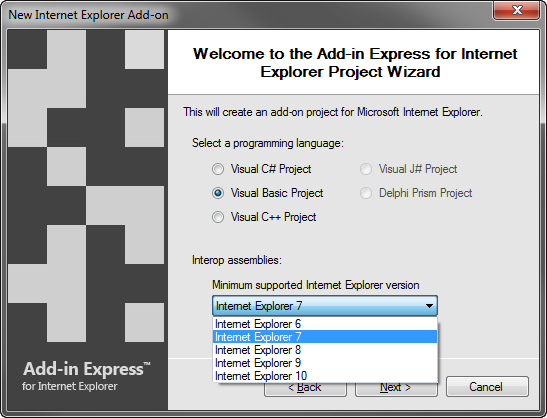
Then choose the programming language for your IE plugin (it is VB.NET in our Browser extension project; but Visual C#; and C++ are also available) and click Finish.
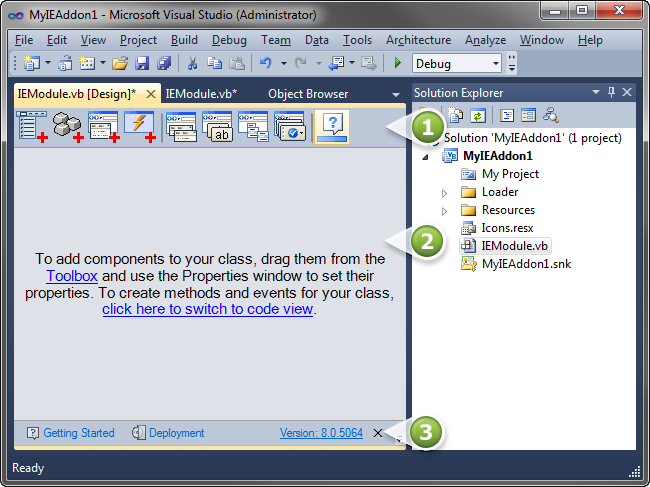
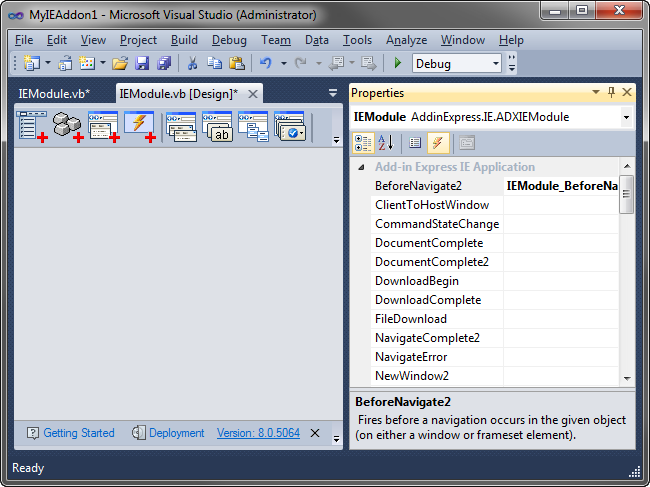
The wizard creates an Internet Explorer add-on solution that consists of two projects: the add-on project itself and its setup project used for deploying your IE extension. 2. The IE ModuleThe main element of the Internet Explorer add-on project is the IE Module, it is the heart of your IE plugin (see the picture below).
First, the IE Module is a descendant of the ADXIEModule class - the ancestor of any IE add-on - that implements required COM-interfaces, registration and deployment features, etc. In addition, the IE Module serves as a container for any other components such as datasets and data binding sources. You can also add a number of Add-in Express components e.g. the Keyboard Shortcut component using the toolbox of the module's designer window. Finally, you concentrate your work around this module since it is a browser helper object that provides "access points" for handling Internet Explorer objects. All in all, this RAD module is the place where your write the applied code of your IE plug-in.
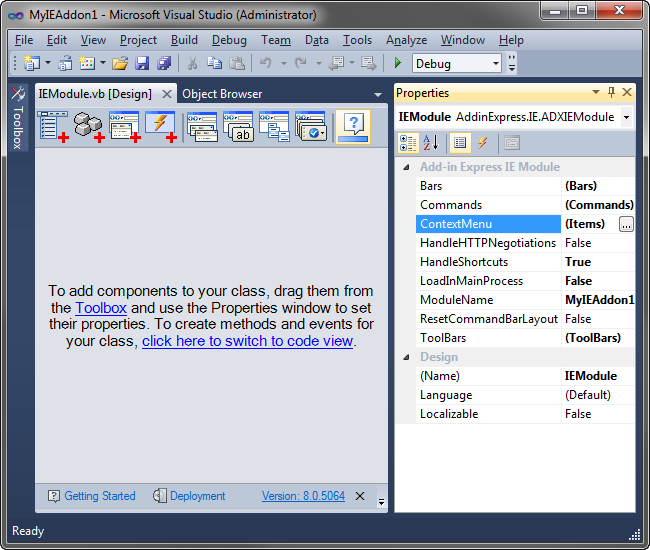
Several IE Module properties available at design-time are important for you, namely:
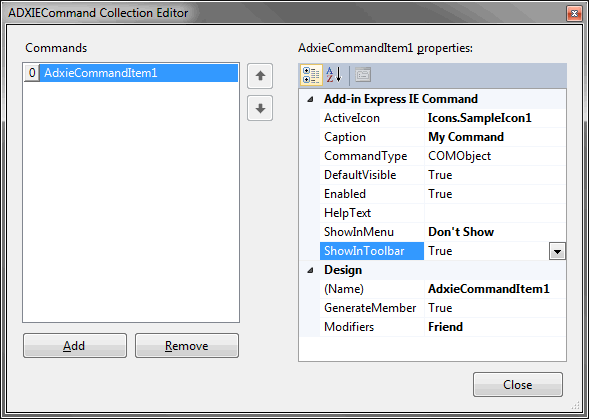
3. Adding custom commands to Internet ExplorerTo add a custom command to the IE user interface, you click the corresponding button in the toolbox or use the Commands collection of the IE Module.
The visual designer allows you to add and sort out your custom commands and customize their properties at design-time. The properties are:
The properties suggest that a command can be shown in the Internet Explorer toolbar and / or in the IE menu:
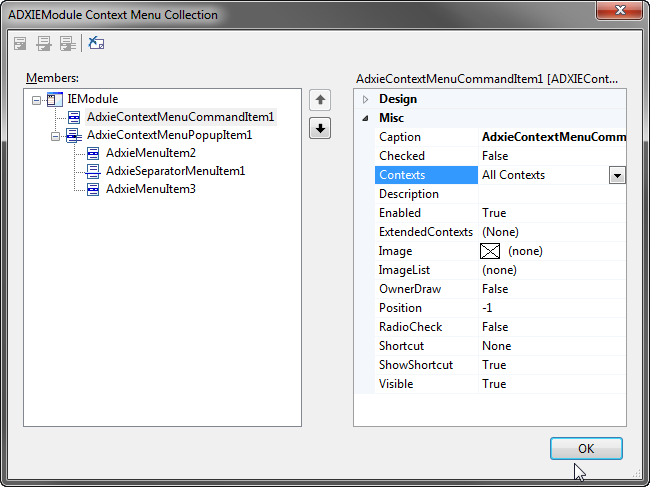
The only event provided by the command is OnClick. An event handler of this event is provided with the HTMLDocument of the active page. 4. Building custom context menu items in IETo add a custom context menu item to some or all Internet Explorer context menus (pop-up menus), you use the ContextMenu collection of your IE Module; the editor of this collection is also accessible through the corresponding button in the toolbox.
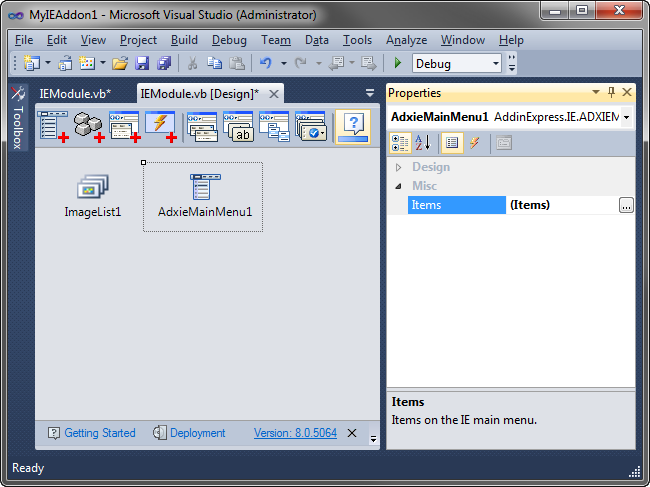
The visual designer of the ContextMenu collection (see the picture above) allows you to add new context menu items at design-time. For every item, you specify the caption and contexts in which the context menu item will be shown. The context menu command provides the OnClick event. It allows the developer to learn the current selection as well as the HTMLElement right-clicked. To fine-tune the creation of an IE context menu item, the developer uses the OnCreateMenuItem. To fit the context menu item into a custom drawing style, you use the OnMeasureMenuItem and OnDrawMenuItem events. 5. Customizing the IE main menuYou use the toolbox to add an ADXIEMainMenu component to the IE addon module.
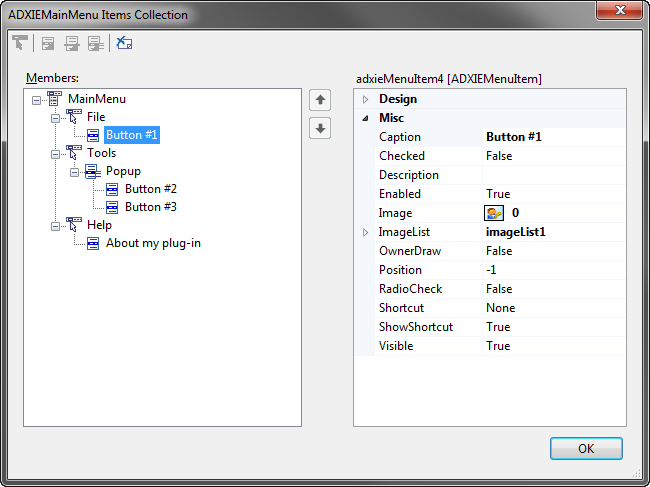
The visual designer of the ADXIEMainMenu.Items collection allows adding new menu items, popups and separators to the IE main menu: File, Edit, View, Tools, and Help.
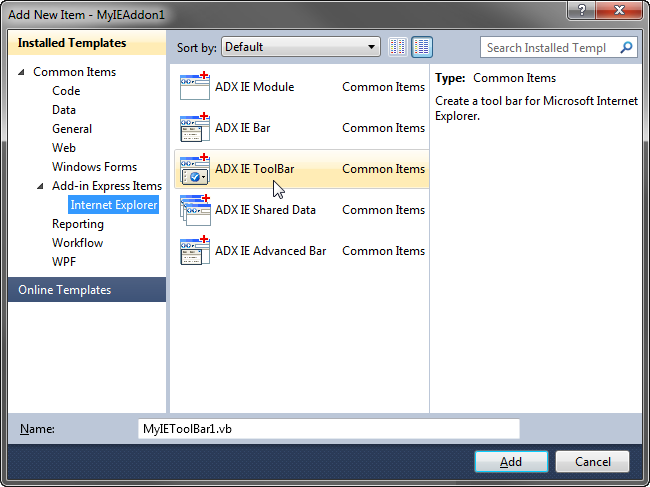
Main menu items provide events similar to that of context menu items. You use the OnClick event to find out the current selection as well as the HTMLElement clicked. To fully control how your custom items are drawn on the main menu of Internet Explorer, you use the OnMeasureMenuItem and OnDrawMenuItem events. 6. Creating a custom IE toolbarAdd-in Express for Internet Explorer contains a special component that you use to build a custom Internet Explorer toolbar. The first step to add a custom toolbar to IE is to add an instance of the component to your IE add-on project; you can find the component in the Add New Item dialog of the add-on project.
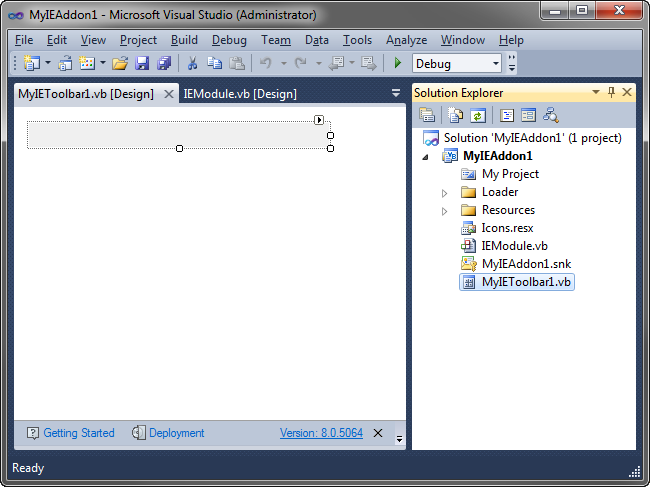
This component, of the AddinExpress.IE.ADXIEToolBar type, derived from UserControl is a ready-to-use custom toolbar in Internet Explorer. In its context menu, you can find the Add Keyboard Shortcut command, add the Keyboard Shortcut component to your custom IE toolbar and make sure that the HandleShortcuts property of the toolbar is set to true (see the picture below). You can add any .NET control onto the toolbar just by using the Toolbox in the Visual Studio IDE.
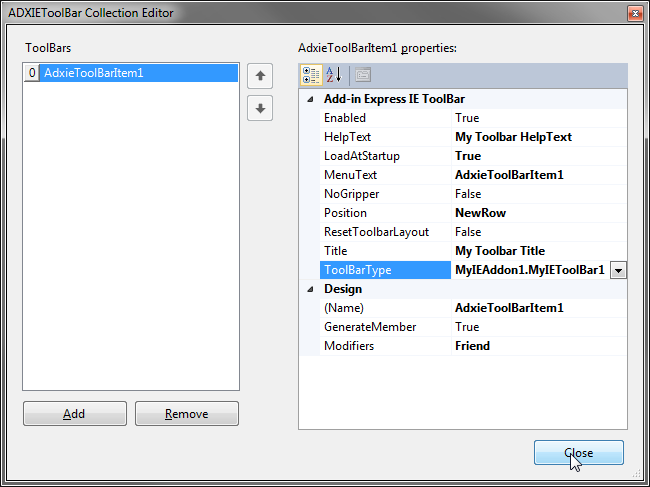
Now, when the IE toolbar itself is prepared, you go on to the second step: add an item to the ToolBars collection of the IE module, bind the item to the toolbar and set the remaining properties of the item (see below).
Here are the properties of an AdxieToolBarItem:
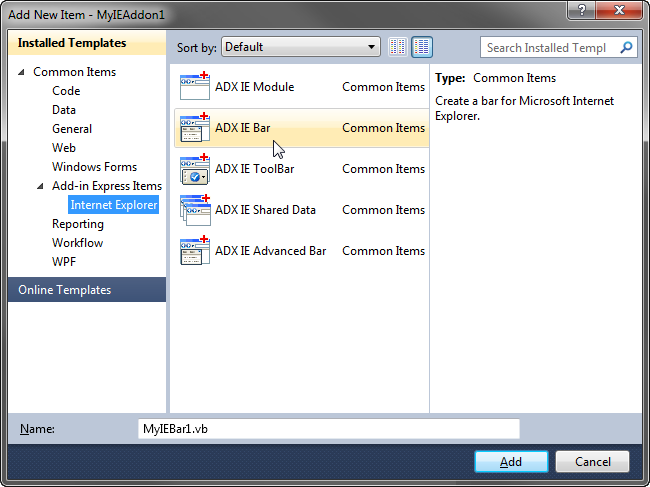
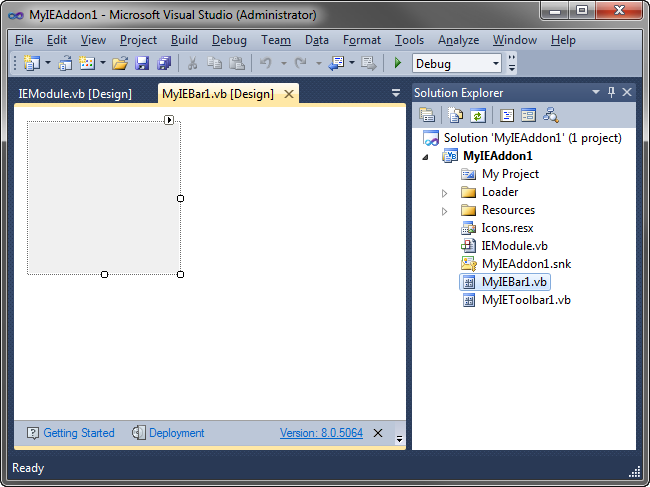
Also note that AddinExpress.IE.ADXIEToolBar provides all IE events, see a complete list of available Internet Explorer events. IE Event handling is described below. See also how to add a button and menu item to IE toolbar. 7. Developing a custom Explorer barThe Internet Explorer SDK allows adding custom Explorer bars. In the IE UI, the menu items that control the visibility of such bars are located in the View | Explorer Bar | %MenuText% menu. With Add-in Express, Internet Explorer bars can be created in two logical steps: you build a bar itself, and then you specify its settings. To make an Explorer bar, you choose the Add-in Express IE Bar item template in the Add New Item dialog (see the picture below) and click the Add button.
This adds a new class to your IE add-on project. This class, derived from UserControl and named AddinExpress.IE.ADXIEBar, is just an empty Explorer bar. Now, you can use standard Visual Studio tools to create UI and business logics of your Explorer bar. Note that in its context menu, it provides the Add Keyboard Shortcut command; you use the command to add an appropriate component to your bar.
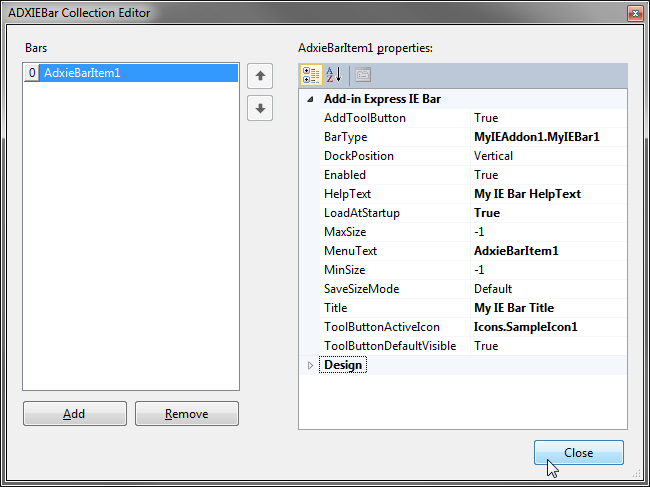
The final step of creating a custom Internet Explorer bar is to tuning it. You add an item to the Bars collection of the IE module. This item binds the Explorer bar component to a number of settings shown below. The settings allow specifying startup behaviour, docking position, size restrictions and text properties related to the visualization of the Explorer bar: caption, menu title, and text to be shown in the Status bar. They also describe the button associated with the Explorer bar that can be shown on the built-in IE toolbar. The most important property is BarType: it binds the IE bar to the item of the Bars collection. More about creating custom Explorer bars and Advanced IE bars.
8. Handling Internet Explorer and HTML eventsAdd-in Express for Internet Explorer delivers all Internet Explorer events in the IE module as well as in ADXIEBar and ADXIEToolBar components. Naturally, you use them like you use any other events in .NET: create an event handler and write your code. Note that the list of events contains events of all Internet Explorer versions, from IE6 to IE11; naturally some events that appeared in later versions will not be triggered when the IE add-on is loaded in an earlier version, e.g. IE 6.
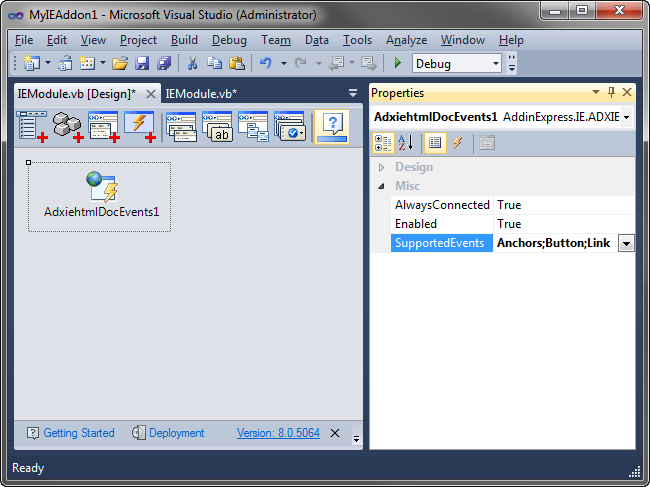
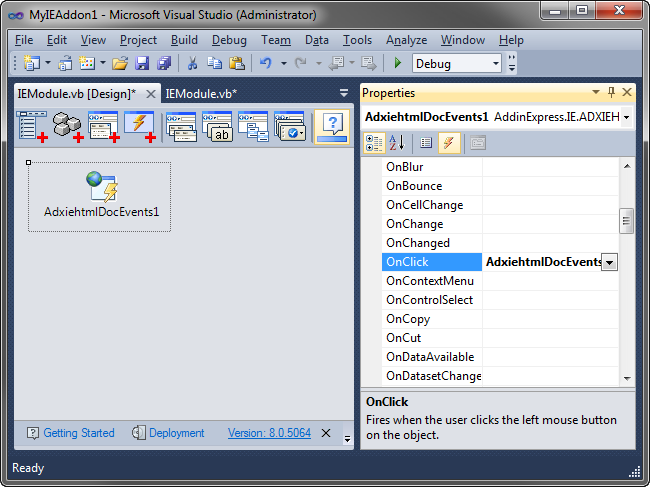
IE events are listed and described in WebBrowser Control Events on MSDN. You can also connect to events of the HTML elements composing the current HTML page. You use the context menu of the add-on module's designer surface to add an ADXIEHTMLDocEvents component onto the module.
You configure the component by specifying the HTML element types the events of which you need to handle. Then, just handle required events.
9. Building, registering and running your Internet Explorer plug-inClose all IE instances and build your IE add-on. If the addon isn't registered yet, register it (see the Register Add-in Express Project command in the Build menu of the VS IDE). Now you can run Internet Explorer and see your plugin in action. To debug your IE addon, specify iexplorer.exe in the Start External Program property of your add-on project and run your Internet Explorer plugin. 10. Deploying and updating your IE add-onAdd-in Express automatically generate a setup project compliable to an MSI installer. The supported setup project types are:
More about Creating MSI installers. You can install and update your IE extension over the web using the ClickTwice technology. You can also prefer just to build the setup project and deliver its output to the end-user. Administrative privileges are required for the plug-in to install. More about IE addon deployment. You may want to download a sample IE add-on in C#, VB.NET with the source code. |
| Related articles - how to make IE plug-ins: |
