|
Add-in Express™
for Microsoft® Office and VSTO Add-in Express Home > Add-in Express for Office and VSTO > Online Guide > Creating Office plugins in VSTO
Creating Office add-in in VSTO
On this page you will find an example of creating Add-ins for Microsoft Excel in VSTO 2008. You can find this sample project in the Demo Projects folder of the Add-in Express install
folder. The sample demonstrates how to create the add-in for Microsoft Excel, but in the same way you can also build add-ins for
Word, PowerPoint, Visio, or InfoPath in VSTO 2005 SE, 2008 and VSTO 2010.
Add-in Express provides additional components for COM Add-ins in Outlook. For more information, please see:
Sample add-in for Excel
The sample Excel add-in project that you see on this page is written in VB.NET, but you can write you plug-in using Visual C# and
Delphi Prism too. You can also download this sample Excel add-in with source code
Step 1. Creating the Office add-in project
If you use Visual Studio 2008 or VS 2010, then choose File | New | Project... in the menu and find the Add-in Express for VSTO Add-in item in
the Extensibility node of the New Project dialog:
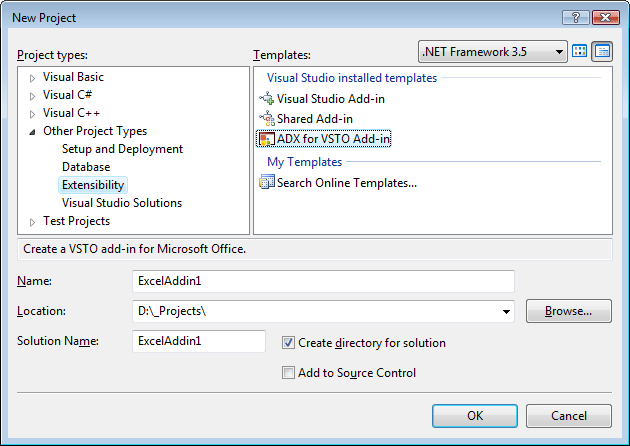
Clicking OK starts the Add-in Express project wizard. In the project wizard window choose the programming language, the host application
of your add-in and its version, make sure that the Generate the Setup Project option is on and click Finish.
If you use Visual Studio 2005 with VSTO 2005 SE installed, then create a new Excel 2003 add-in solution and, in the
Add New Item dialog, choose the Add-in Express Module item as shown on the screenshot
below:
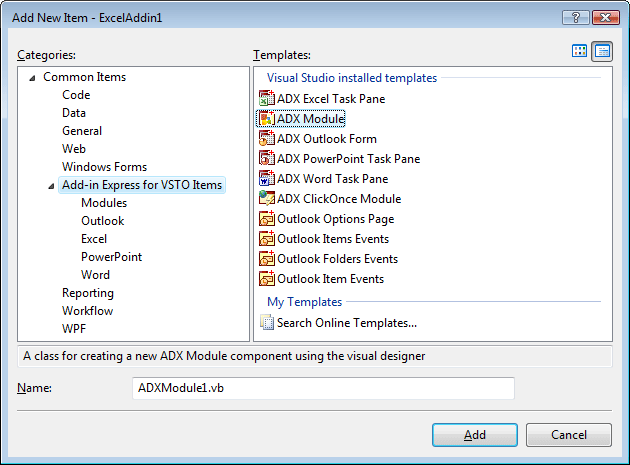
This produces the following code in ThisAddin.vb:
Public Class ThisAddIn
    Private Sub ThisAddIn_Startup(ByVal sender As Object, _
        ByVal e As System.EventArgs) Handles Me.Startup

        'Add-in Express for VSTO generated code
        ADXModule.Initialize(Me, System.Type.GetType("ExcelAddin1.ADXModule"))

        Me.Application = _
            CType( _
                Microsoft.Office.Tools.Excel.ExcelLocale1033Proxy.Wrap _
                    (GetType(Excel.Application), Me.Application), _
                Excel.Application)
    End Sub

    Private Sub ThisAddIn_Shutdown(ByVal sender As Object, _
        ByVal e As System.EventArgs) Handles Me.Shutdown
        'Add-in Express for VSTO generated code
        ADXModule.Finalize(Me)
    End Sub
End Class
Also, this adds the ADXModule.vb (or ADXModule.cs) file to your add-in project. We are going to look at
this file in the next step.
Step 2. Add-in Express module
ADXModule1.vb (or ADXModule1.cs) is a COM Add-in module that is the core part of the Excel add-in project
(see Add-in Express module). It is a container of the Add-in Express components
which allow you to concentrate on the functionality of your Office add-in. You specify the add-in properties in the module's properties,
add the Add-in Express components to the module's designer, and write the functional code of your add-in in this module.
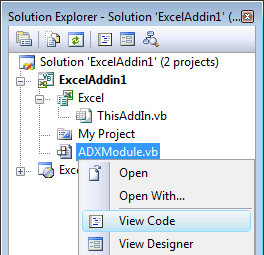
The code for ADXModule.vb is as follows:
Imports System.Runtime.InteropServices
Imports System.ComponentModel
Imports System.Windows.Forms
Imports Excel = Microsoft.Office.Interop.Excel
Imports Office = Microsoft.Office.Core

'Add-in Express for VSTO Module
Public Class ADXModule
    Inherits AddinExpress.VSTO.ADXExcelAddin

#Region " Component Designer generated code. "
    'Required by designer
    Private components As System.ComponentModel.IContainer

    'Required by designer - do not modify
    'the following method
    Private Sub InitializeComponent()

    End Sub

#End Region

#Region " Add-in Express automatic code "

    'Required by Add-in Express - do not modify
    'the methods within this region

    Public Overrides Function GetContainer() As System.ComponentModel.IContainer
        If components Is Nothing Then
            components = New System.ComponentModel.Container
        End If
        GetContainer = components
    End Function

#End Region

    Public Sub New(ByVal Application As Object)
        MyBase.New(Application)

        'This call is required by the Component Designer
        InitializeComponent()

        'Add any initialization after the InitializeComponent() call

    End Sub

    Public Sub New()
        MyBase.New()

        'This call is required by the Component Designer
        InitializeComponent()

        'Add any initialization after the InitializeComponent() call

    End Sub

    Public ReadOnly Property ExcelApp() _
        As Microsoft.Office.Interop.Excel.Application
        Get
            Return HostApplication
        End Get
    End Property

End Class

Partial Public Class ThisAddIn

    Protected Overrides Function RequestService(ByVal serviceGuid As Guid) As Object
        If serviceGuid = _
            GetType(AddinExpress.VSTO.IRibbonExtensibility).GUID Then
            Dim useMSORibbon As Boolean = False
            Dim types As Type() = Me.GetType().Assembly.GetTypes()

            For i As Integer = 0 To types.Length - 1
                If (types(i).IsClass And _
                    types(i).BaseType.FullName.Equals _
                        ("Microsoft.Office.Tools.Ribbon.OfficeRibbon")) _
                Then
                    useMSORibbon = True
                    Exit For
                End If
            Next

            If (Not useMSORibbon) Then
                ADXModule.Initialize(Me, _
                    System.Type.GetType("ExcelAddin1.ADXModule"))
                Return ADXModule.CurrentInstance
            End If
        End If

        Return MyBase.RequestService(serviceGuid)
    End Function

End Class
Please, pay attention to the ExcelApp property of the module. You can use it in your code to get access to Excel objects.
Step 3. Add-in Express designer
The designer of the add-in module allows setting add-in properties and adding components to the module. To open the designer,
right-click the add-in module in Solution Explorer and choose the View Designer popup menu item
(see Adding components to the Add-in Module).
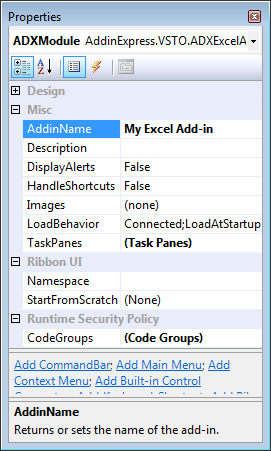
The designer provides add-in properties and a number of events including add-in events, Excel events, Ribbon control events,
and custom task pane related events. It is also a container for Add-in Express components that can be added to the module via the
context menu of the designer.
The following commands add the following components to the module:
- Add CommandBar - adds a command bar to your add-in (see Command bars)
- Add Explorer CommandBar - adds an Outlook Explorer command bar to your add-in
- Add Inspector CommandBar - adds an Outlook Inspector command bar to your add-in
- Add Built-in Control Connector - adds a component that allows intercepting the action of a built-in control of the host application(s)
(see Built-in Control Connector)
- Add Keyboard Shortcut- adds a component that allows intercepting application-level keyboard shortcuts
(see Keyboard shortcut)
- Add Outlook Bar Shortcut Manager - adds a component that allows adding Outlook Bar shortcuts and shortcut groups
(see Outlook Bar Shortcut Manager)
- Add Outlook Forms Manager - adds a component that allows embedding custom .NET forms into Outlook windows
(see Outlook Forms Manager)
- Add Ribbon Tab - adds a Ribbon tab to your add-in (see Office 2007 Ribbon components)
- Add Ribbon Quick Access Toolbar - adds a component that allows customizing the Ribbon Quick Access Toolbar in your add-in
- Add Ribbon Office Menu - adds a component that allows customizing the Ribbon Office Menu in your add-in
In the Properties window, you set the name and description of your add-in
(see also Add-in Express module).
Step 4. Adding a new command bar
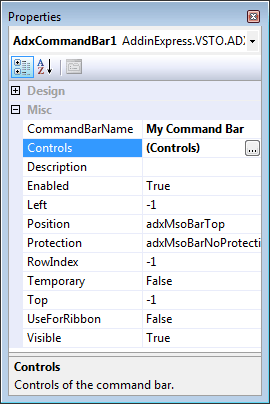
To add a command bar to your add-in, use the Add CommandBar command that adds an ADXCommandBar component to
the Add-in Module.

Select the command bar component and, in the Properties window, specify the command bar name using the CommandBarName
property. In addition, you choose its position in the Position property. (See also Command
bars).
Step 5. Adding a new toolbar button
To add a new button to the Office add-in toolbar, choose the Controls property, and click the property editor button.
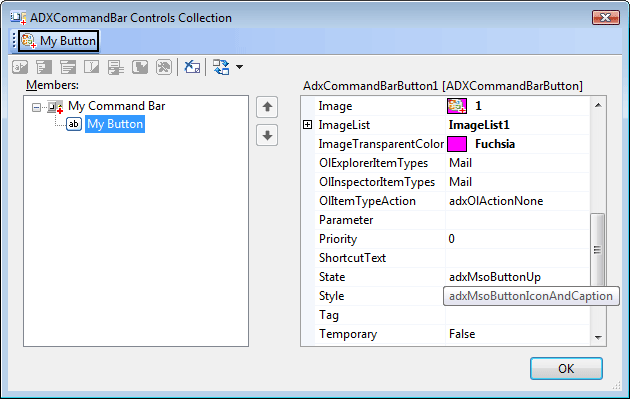
Specify the button's Caption property, set the Style property (default value = adxMsoButtonCaption), and close the
collection editor. To handle the Click event of the button, select the added button in the topmost combo of the Properties window
and add the Click event handler.
Step 6. Accessing host application objects
The Add-in Module provides the HostApplication property that returns the Application object (of the Object type)
of the host application the add-in is currently running in. For your convenience, the Add-in Express Project Wizard adds host-related
properties to the Add-in module. You use these properties to access host application objects. For instance, this sample add-in has the
ExcelApp property in the Add-in Module:
Public ReadOnly Property ExcelApp() As Excel._Application
    Get
        Return HostApplication
    End Get
End Property
This allows us to write the following code to the Click event of the newly added button.
Private Sub DefaultAction(ByVal sender As System.Object) _
    Handles AdxCommandBarButton1.Click
    MsgBox("The current cell is " + GetAddress())
End Sub

Friend Function GetAddress() As String
    Dim Address As String = "Unknown"
    Dim ActiveWindow As Excel.Window = Me.ExcelApp.ActiveWindow
    If Not ActiveWindow Is Nothing Then
        Dim ActiveCell As Excel.Range = ActiveWindow.ActiveCell
        'relative address
        Address = ActiveCell.AddressLocal(False, False)
        Marshal.ReleaseComObject(ActiveCell)
        Marshal.ReleaseComObject(ActiveWindow)
    End If
    Return Address
End Function
The use of Marshal.ReleasComObject is described in Releasing COM objects.
Step 7. Customizing the main menu
Add-in Express provides a component to customize the main menu of any Office application. Some Office applications have several main
menus and Excel is a good example: Excel 2003 provides two main menus called Worksheet Menu Bar and Chart Menu Bar. Naturally,
Excel 2007 and Excel 2010 don't show these menus; they are replaced with the Ribbon UI. Nevertheless, these menus still exist and you
may want to use this fact in your code.
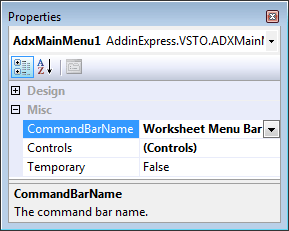
To customize the File menu in Excel version 2003, add a main menu component and, in the CommandBarName property, specify the main menu.
The screenshot shows how you set up the main menu component in order to customize the Worksheet Menu Bar main menu in Excel 2003.
Now you can use the Controls property to add custom and built-in controls to the main menu. Please note, however, that Office
imposes restrictions on the control types available to the developer when customizing the main menu; you can use command bar buttons
and command bar popups only.
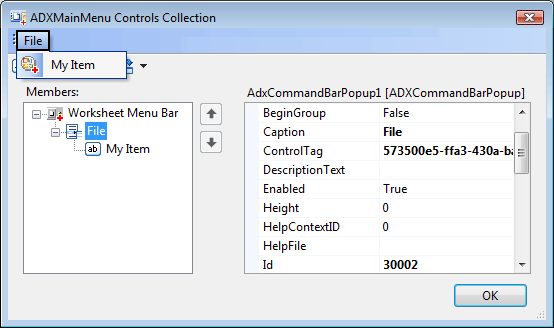
The screenshot above shows how to add a custom button to the File menu of Excel. First off, you add a popup control and specify its Id
property: in our example it is 30002, which is the ID of the File menu in Office applications. To find this and similar IDs, use our free
Built-in Control Scanner.
Then you add a button and set its properties in the way described in Step 5. Adding a new toolbar button.
Pay attention to the BeforeID property of the button. To show the button before the New button, you set this property to 3, which
is the ID of the New button. Also, remember that showing an image for the button as well as for any command bar control requires choosing
a correct value for the Style property.
Step 8. Customizing an Office context menu
A context menu is a specific command bar that can be customized too. Add-in Express allows customizing a context menu via the
Context Menu component. Its use is similar to that of the Main Menu component:
- Add a context menu component to the add-in module
- Specify the host application, the context menu of which you need to customize
- Specify the context menu to customize
- Add custom controls to the Controls collection
See how to set up such a component to add a custom button to the Cell menu of Excel.
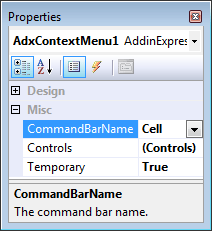
Now, using the visual designer of the Controls collection, you can add buttons and pop-ups to the context menu. Note that,
in context menus, a popup is shown as a drop-down item.
You may want to use the BeforeAddControls event provided by the component to modify the context menu depending on the current
context. Say the context menu may reflect the Excel cell content, the current chart, etc.
There are several issues related to using command bar based context menus:
- Excel contains two different context menus called Cell. This fact breaks down the command bar development model
because the only way to recognize two command bars is to compare their names. In this case, the context menu component cannot distinguish
context menus. Accordingly, it connects to the first context menu of the name specified by you.
- Command bar based context menu items cannot be positioned in the Ribbon-based context menus: a custom context menu item created
with the ADXContextMenu component will always be shown below the built-in and custom context menu items in a Ribbon-based context menu
of Office 2010.
To add a custom item to a context menu in Office 2010, you use the ADXRibbonContextMenu component. Unlike its commandbar-based
counterpart (ADXContextMenu), this component allows adding custom Ribbon controls to several context menus in the specified Ribbons.
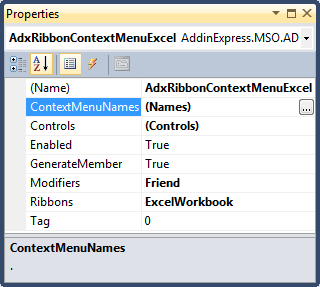
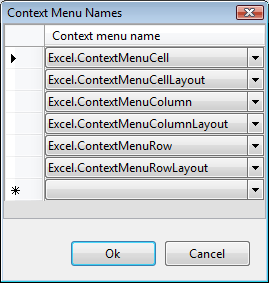
The screenshots below demonstrate component settings required for adding a control to the ExcelWorkbook Ribbon. To specify the context
menus, to which the control will be added, you use the editor of the ContexMenuNames property of the component.
Step 9. Handling host application events
You might see that the Click event handler in the previous step fires an exception when there are no opened workbooks.
To prevent this, you may disable the button when a window deactivates and enable it when a window activates. The add-in module
provides all events of the host application (it's Excel in this case) so you can write the following code:
   Private Sub ADXModule1_WindowActivate(ByVal sender As Object, _
      ByVal hostObj As Object, ByVal window As Object) _
      Handles Me.WindowActivate
      Me.AdxCommandBarButton1.Enabled = True
   End Sub
   Private Sub ADXModule1_WindowDeactivate(ByVal sender As Object, _
      ByVal hostObj As Object, ByVal window As Object) _
      Handles Me.WindowDeactivate
      Me.AdxCommandBarButton1.Enabled = False
   End Sub
Step 10. Handling Excel worksheet events
In the same way, you process worksheet-level events. In the code of the event class, you add the following code to the procedure
that handles the BeforeRightClick event of the Worksheet class:
   Private Sub ADXModule1_SheetBeforeRightClick(ByVal sender As Object, _
      ByVal e As AddinExpress.VSTO.ADXExcelSheetBeforeEventArgs) _
      Handles Me.SheetBeforeRightClick
      Dim R As Excel.Range = CType(e.Range, Excel.Range)
      'Cancel right-clicks for the first column only
      If R.Address(False, False).IndexOf("A") = 0 Then
         MsgBox("Context menu will not be shown!")
         e.Cancel = True
      Else
         e.Cancel = False
      End If
   End Sub
Step 11. Customizing the Office 2007 and 2010 Ribbon user interface
To add a new tab to the Ribbon UI, you use the Add Ribbon Tab command that adds an ADXRibbonTab component to the module.

In the Properties window, run the visual designer for the Controls collection of the tab. In the designer, use the toolbar buttons
or context menu to add or delete components that form the Ribbon interface of your add-in. First, change the caption of your tab to
My Ribbon Tab. Then, select the tab, add a Ribbon group, and change its caption to My Ribbon Group. Next, select the group, and add
a button group. Finally, select the button group and add a button. Set the button caption to My Ribbon Button. Use the ImageList and
Image properties to set the icon for the button.
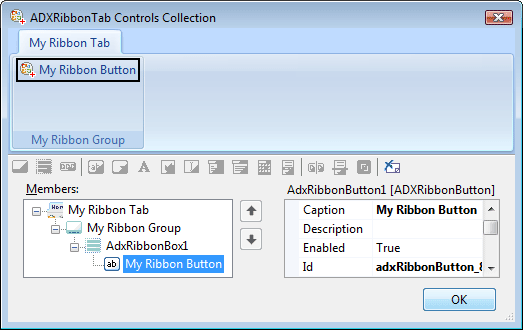
Click OK, and, in the Properties window, find the newly added Ribbon button. Now add the event handler to the Click event of
the button. Write the following code:
    Private Sub AdxRibbonButton1_OnClick(ByVal sender As System.Object, _
        ByVal control As AddinExpress.VSTO.IRibbonControl, _
        ByVal pressed As System.Boolean) Handles AdxRibbonButton1.OnClick
        AdxCommandBarButton1_Click(Nothing)
    End Sub
In the code of this sample add-in, you can find how you can customize the Office Button menu in Office 2007, see the component
named AdxRibbonOfficeMenu1. As to the Backstage View, also known as File Tab in Office 2010, the sample project provides the
AdxBackstageView1 component that implements the customization shown in Figure 3 at
Introduction to the Office 2010 Backstage View for
Developers. Note, if you customize the Office Button menu only, Add-in Express maps your controls to the Backstage View when the
add-in is loaded by Office 2010. If, however, both Office Button menu and File tab are customized at the same time, Add-in Express ignores
custom controls you add to the Office Button menu. See also Office Ribbon components.
Step 12. Adding custom task panes in Office 2003, 2007 and 2010
Creating a new Excel task pane includes the following steps:
- Adding an Excel Task Panes Manager (ADXExcelTaskPanesManager) to your add-in module.
- Adding an Add-in Express Excel Task Pane (ADXExcelTaskPane) to your project.
- Adding an item to the Items collection of the manager, select the newly added pane in the TaskPaneClassName property of
the item and set other properties, such as Position (see the screenshot below):
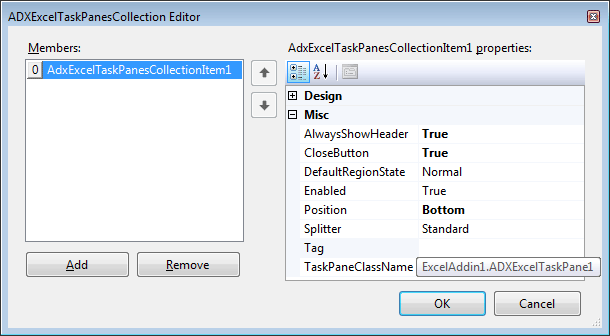
The properties shown in the screenshot above are:
- AlwaysShowHeader - specifies that the pane header will be shown even if the pane is the only pane in the current region
- CloseButton - specifies if the Close button will be shown in the pane header. Obviously, there's not much sense in setting
this property to true when the header isn't shown.
- Position - specifies the region in which an instance of the pane will be shown. Excel panes are allowed in four regions
docked to the four edges of the main Excel window: Right, Bottom, Left, and Top.
- TaskPaneClassName - specifies the class name of the Excel task pane.
Now you add a label onto the form and set the label up in the following code:
Private Sub RefreshTaskPane()
    Dim Pane As ADXExcelTaskPane1 = _
                TryCast(Me.AdxExcelTaskPanesCollectionItem1.TaskPaneInstance,  _
                    ADXExcelTaskPane1)
    If Pane IsNot Nothing Then
        Pane.Label1.Text = Me.GetAddress()
    End If
End Sub
More about Excel and Outlook custom task panes.
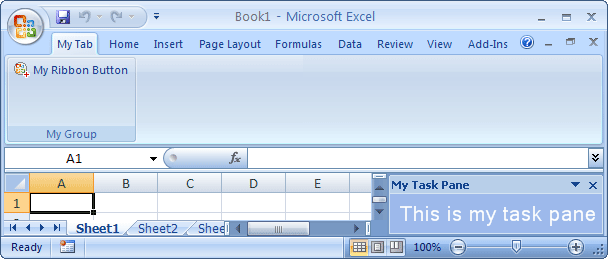
Step 13. Running the add-in
Choose the Build <Add-in Project Name> item in the Build menu, then restart Excel, and find your command bars, ribbon tabs,
and custom task panes in place. You also find your add-in in the COM Add-ins dialog.
Step 14. Debugging the add-in
To debug your Office add-in, just choose the Start Debugging item in the Debug menu of Visual Studio.
Step 15. Deploying your Excel add-in
Build the setup project, transfer the files to the target PC and run the setup.exe.
See also Deployment of Office add-in in VSTO.
You may also want to download a free sample Excel addin in VSTO with source code.
|


