Write Outlook add-in / plugin in C#, VB.NET
|
Add-in Express™ Add-in Express Home > Add-in Express for Office and .NET > Online Guide > Writing Outlook COM How to create Outlook COM add-insThe example below gives you a step-by-step guidance on developing a version independent COM add-in for Outlook. The plug-in creates two toolbars: for the Outlook Explorer and Inspector windows, the toolbars show up in the UI of pre-Ribbon versions. A custom CommandBar button is added to the toolbars as well as to context menu and the Explorer main menu of Outlook 2007 - 2000. In Outlook 2024 - 2007, a ribbon button is added to the Ribbon UI of the inspector windows. Also, the addin creates an advanced task pane supporting all versions. Finally, a custom property page is added to the Properties dialog of a folder and a keyboard shortcut is intercepted. This sample add-in is written in VB.NET, but you can also write your plug-ins in Visual C# and C++.NET. You can download the source code of the project as well as plenty more samples on the How-To pages: VB.NET add-in for Outlook and C# addin for Outlook. For more details, please see Outlook add-in development - special features Step 1. Creating an Outlook add-in projectMake sure that you have administrative permissions before running Visual Studio. Run Visual Studio via the Run as Administrator command. In Visual Studio, open the New Project dialog and navigate to the Extensibility folder.
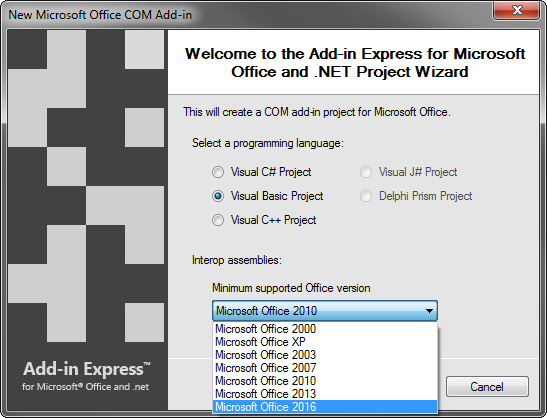
Choose Add-in Express COM Add-in and click OK. The wizard allows choosing your programming language (VB.NET, C# or C++ .NET) and specifying the oldest Office version your plugin needs to support.
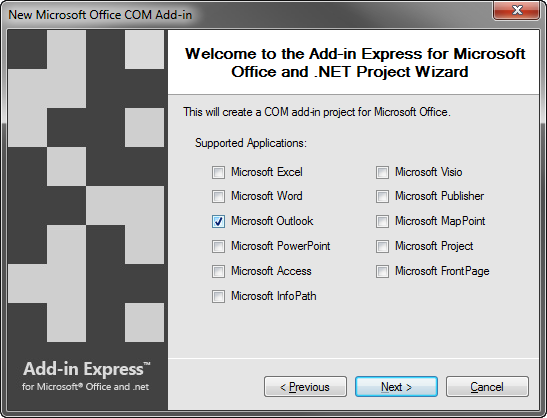
Let's select VB.NET as our programming language of choice and Office 2010 as the minimum Office version so that our plugin will work in Outlook 2010 and higher. Click Next and choose Outlook as the only targeted application.
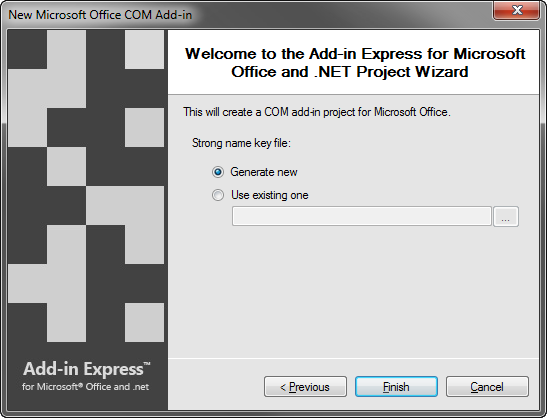
On the next step choose whether to generate new or specify an existing .snk file.
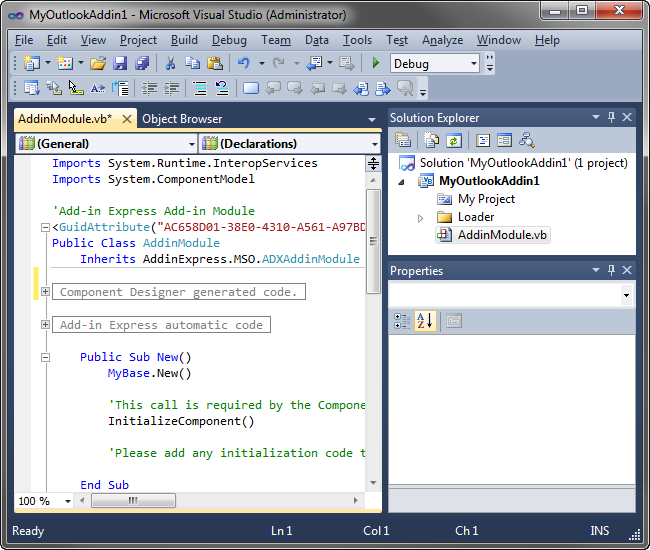
If you don't know anything about strong names or don't have a special strong name key file, choose Generate new. If you are in doubt, choose Generate new. If, later on, you need to use a specific strong name key file, you will be able to specify its name on the Signing tab of your project properties; you are required to unregister your add-in project before using another strong name. You will find the newly created solution in the IDE.
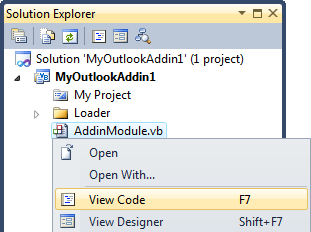
The solution contains an only project, the COM add-in project. The VB.NET Outlook addin project contains the AddinModule.vb file and a C# project contains AddinModule.cs, discussed in the next step. Step 2. Add-in moduleAddinModule.vb (or AddinModule.cs) is the core part of the project. It is a container for components essential for the functionality of your add-in. You specify the add-on properties in the module's properties, put components onto the module's designer, and write the functional code of your add-in in this module. To review its source code, in the Solution Explorer, right-click AddinModule.vb (or AddinModule.cs) and choose View Code in the popup menu.
In the code of the module, pay attention to three points:
The comment suggests that you write any initialization code in the AddinInitialize or AddinStratupComplete events of the add-in module, not in the constructor. This is important because an instance of the module is created (this runs the constructor) when your plug-in is being registered and unregistered. When the module is created for this purpose, no Office objects, properties, methods or events are available. If your code is not prepared for this, the installer of your add-in will fail. Moving custom initialization code out of the module's constructor allows preventing installation failures.
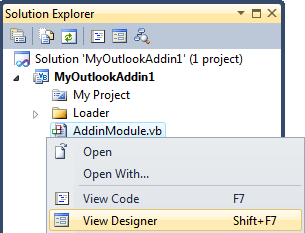
This property was added by the COM add-in project wizard. You use it as an entry point to the Outlook object model; see Step 11. Accessing Outlook objects. This property returns the current instance of the add-in module, a very useful thing when, for example, you need to access the add-in module from the code of an advanced Outlook region. Step 3. Add-in module designerIn Solution Explorer, right-click AddinModule.vb (or AddinModule.cs) and choose View Designer in the context menu.
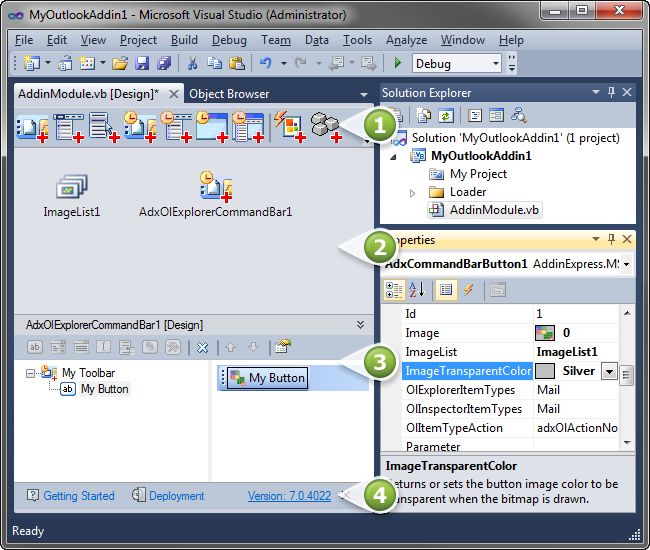
The add-in module designer view provides access to the following three areas:
The areas are shown in the screenshot below:
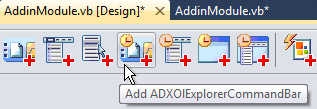
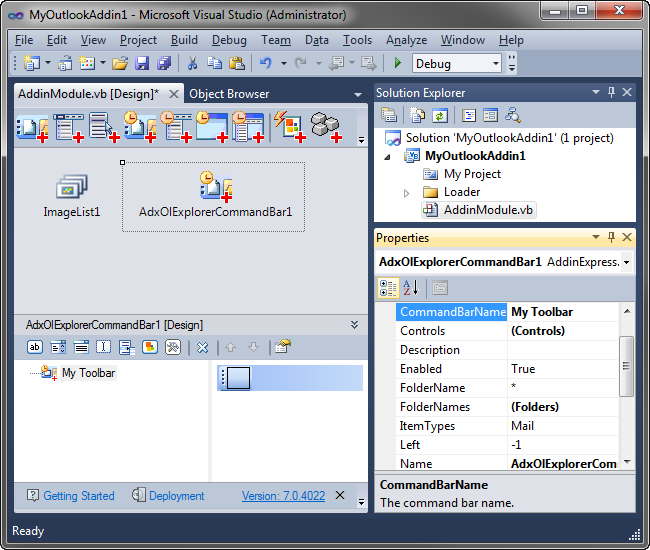
To put any Add-in Express component onto the module, you click an appropriate command in the Add-in Express Toolbox (#1 in the screenshot above). Then you select the newly added component and set it up using the visual designer (#3 in the screenshot above) and Properties window. Note that the add-in module provides a number of properties. Click the designer surface and specify the name and description of your plug-in in the Properties window. Also, pay attention to the RegisterForAllUsers property � it is essential for distinguishing per-user and per-machine plug-ins; you must unregister the add-in project before modifying this property. Step 4. Creating a new Outlook Explorer toolbarTo add a toolbar to the Outlook 2000-2007 Explorer window, click the Add ADXOlExplorerCommandBar command in the Add-in Express Toolbox. This places a new ADXOlExplorerCommandBar component onto the add-in module.
You may use both Command Bar UI and Ribbon UI components on the add-in module. When your plugin is loaded in a particular version of the host application, either command bar or ribbon controls will show up. Find additional information in Command Bars on the Office Ribbon. Select the command bar component just created and, in the Properties window, specify the command bar name in the CommandBarName property.
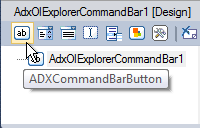
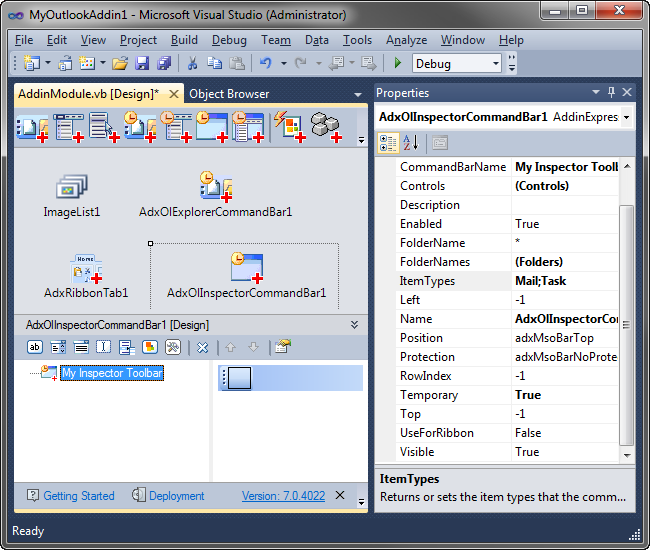
ADXOlExplorerCommandBar provides context-sensitive properties: they are FolderName, FolderNames, and ItemTypes. The component displays the specified Explorer command bar for every Outlook folder, the name and default item type of which correspond to the values specified in the FolderName, FolderNames, and ItemTypes properties. Note that the FolderName and FolderNames properties require entering the full path to a folder. FolderName also accepts "*" (asterisk), which means "for every folder". This is the only use of the asterisk recognizable in the current version. In other words, Add-in Express does not support template characters in the FolderName(s) properties. In the screenshot above, you see the properties of the Outlook Explorer command bar that will be shown for every Outlook folder (FolderName = "*") the default item type of which is Mail or Task. The component creates controls on the toolbar the name of which you specify in the CommandBarName property. If the toolbar is missing in Outlook, the component creates it. That is, if you set CommandBarName = "Standard", and add an ADXCommandBarButton to the Controls collection of the ADXOlExplorerCommandBar component, this will create the button on the built-in Standard toolbar, while specifying CommandBarName = "Standard2" will create a new toolbar, Standard2, with the button on it. If the Standard2 toolbar already exists in Outlook, the button will be added to that toolbar. Use our free Built-in Controls Scanner to get the names of all built-in command bars in any Office 2013-2000 application. Step 5. Creating a new toolbar buttonSelect the command bar component on the add-in module designer and open the in-place designer area. In this area, you'll see the visual designer of the ADXOlExplorerCommandBar component. Use its toolbar to add or remove command bar controls.
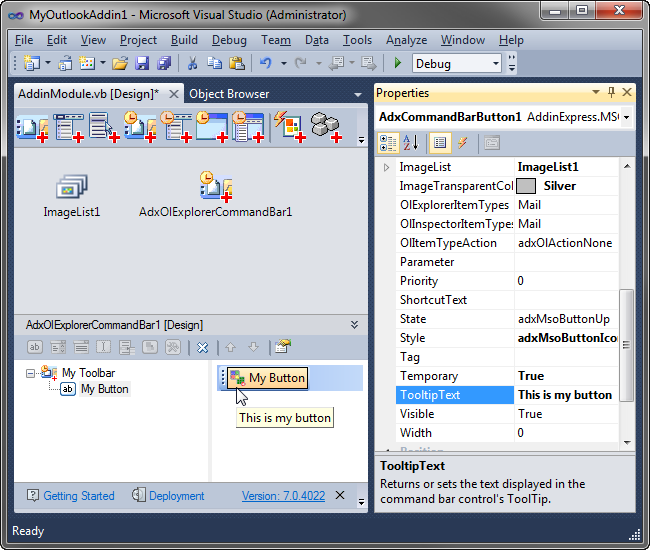
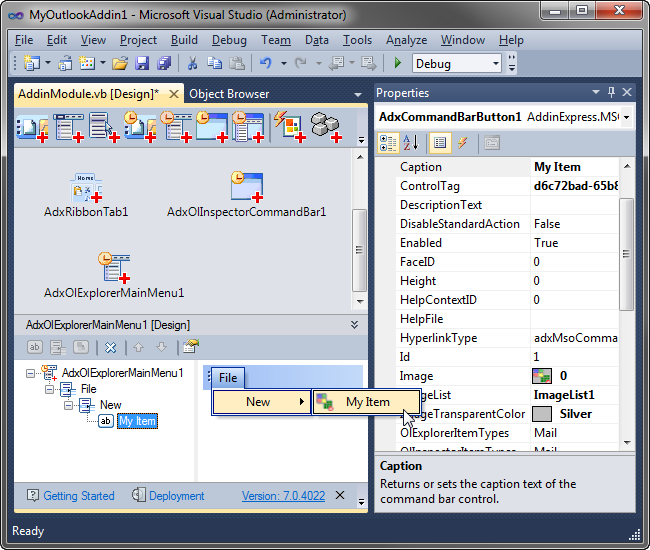
To add an icon to the button, add an ImageList to the add-in module and specify the ImageList, Image, and ImageTransparentColor properties of the button. Note that the Style property (not shown in the screenshot) is set to adxMsoButtonIconAndCaption in order to show the icon because command bar buttons do not show icons by default. The screenshot below demonstrates button properties that make the image used in the sample project show up as transparent.
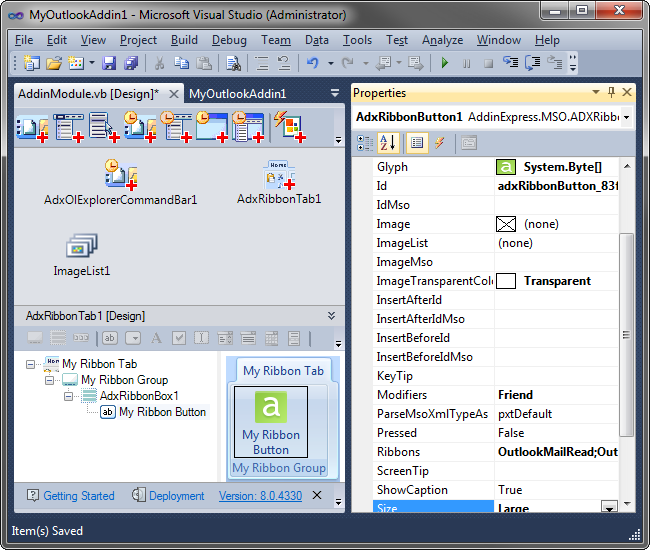
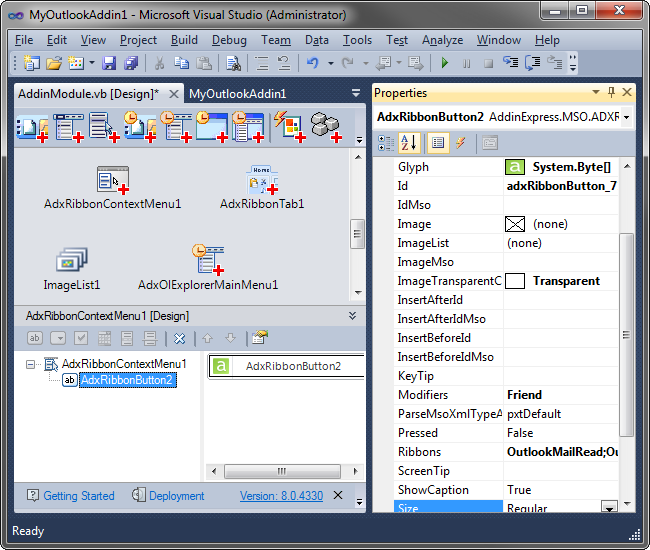
See also Command Bar Control Properties and Events. Step 6. Customizing the Outlook Ribbon user interfaceTo add a new custom tab to the Ribbon UI, you use the Add ADXRibbonTab command that places a new ADXRibbonTab component onto the module. The ribbons in which that tab will be shown are set by the Ribbons property. For an Outlook plugin, the default value of this property is OutlookMailRead;OutlookMailCompose which means that the tab will be shown in the Mail Inspector windows of Outlook 2007 and higher. In order to show that tab in the Outlook Explorer windows as well, set the Ribbons property to OutlookMailRead;OutlookMailCompose;OutlookExplorer.
You use the visual designer of the ADXRibbonTab component to populate a Ribbon tab with Add-in Express components that form the Ribbon interface of your add-in. In this sample, you add a Ribbon tab component and change its caption to My Ribbon Tab. Then you select the tab component, add a Ribbon group, and change its caption to My Ribbon Group. Finally, you select the group and add a button. Set the button caption to My Ribbon Button. Use the Glyph property to set the image for the button.
See also Office Ribbon components. Step 7. Creating a new Inspector toolbarTo add a custom toolbar to Outlook 2000-2003 Inspector windows, use the Add ADXOlInspectorCommandBar command that places a new ADXOlInspectorCommandBar component onto the add-in module.
ADXOlInspectorCommandBar provides the same context-sensitive properties as ADXOlExplorerCommandBar: the properties are FolderName, FolderNames, and ItemTypes. Add-in Express displays the Inspector command bar for every item created or opened in an Outlook folder, the name and default item type of which correspond to the values specified in the FolderName, FolderNames, and ItemTypes properties. Note that the FolderName and FolderNames properties require entering the full path to a folder. FolderName also accepts "*" (asterisk), which means "for every folder". This is the only use of the asterisk recognizable in the current version. In other words, Add-in Express doesn't support template characters in the FolderName(s) properties.
In the screenshot above, you see the properties of the Outlook Inspector command bar that will be shown for every Outlook folder (FolderName = "*") the default item type of which is Mail or Task. If the toolbar name is the same as the name of a built-in command bar of the host application, then the component will create the controls you specify on the built-in toolbar. Otherwise, the component will create a new toolbar at run time. That is, if you set CommandBarName = "Standard", and add, say, an ADXCommandBarButton to the Controls collection of the ADXOlInspectorCommandBar component, this will create the button on the built-in Standard toolbar, while specifying CommandBarName = "Standard2" will create a new toolbar, Standard2, with the button on it. If the Standard2 toolbar already exists in the host application, the button will be added to that toolbar. Use our free Built-in Controls Scanner to get the names of all built-in command bars in any Office 2000-2010 application. For adding a new command bar button onto the inspector toolbar see Step 5. Adding a new toolbar button. See also Command Bar UI components. Step 8. Customizing main menu in Outlook 2000 - 2007Outlook 2000-2003 provides two main menu types. They are available for two main types of Outlook windows: Explorer and Inspector. Accordingly, Add-in Express Toolbox provides two Outlook-related main menu components: Explorer Main Menu component and Inspector Main Menu component. The Ribbon UI replaces the main menu of Inspector windows in Outlook 2007 and all main menus in Outlook 2010 and above. Nevertheless, the main menu as well as all command bars and their controls are still available for the developer, please see Navigating up and down the command bar system. To demonstrate the standard steps required when dealing with built-in CommandBar controls, we will add a custom control to the File | New popup in the Explorer window of Outlook 2000-2007.
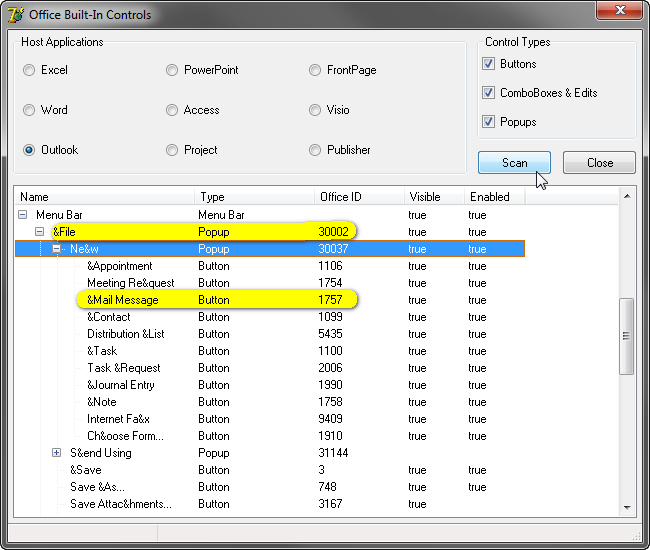
You start our free Built-in Control Scanner to scan the command bars and controls of Outlook. The screenshot below shows the result of scanning.
You need the Office IDs shown in the screenshot to bind Add-in Express components to the corresponding CommandBar controls built in the host application of your add-in. Now add an Outlook Inspector Main Menu component onto the add-in module and do the following (all values below are taken from the screenshot above):
The following screenshot shows the settings of the popup created at step 2 above:
See also Connecting to existing commandBar controls. Step 9. Customizing Outlook context menuAdd-in Express allows customizing commandbar-based context menus of Outlook 2002-2007 via the ADXContextMenu component (Outlook 2000 context menus are not customizable, and Outlook 2013 doesn't support commandbar-based context menus either). Click the corresponding command in the Add-in Express Toolbox to add such a component onto the add-in module. Then choose Outlook in the SupportedApp property of the component. Then, in the CommanBarName property, choose the context menu you want to customize. Finally, you add custom controls using the visual designer of the context menu component.
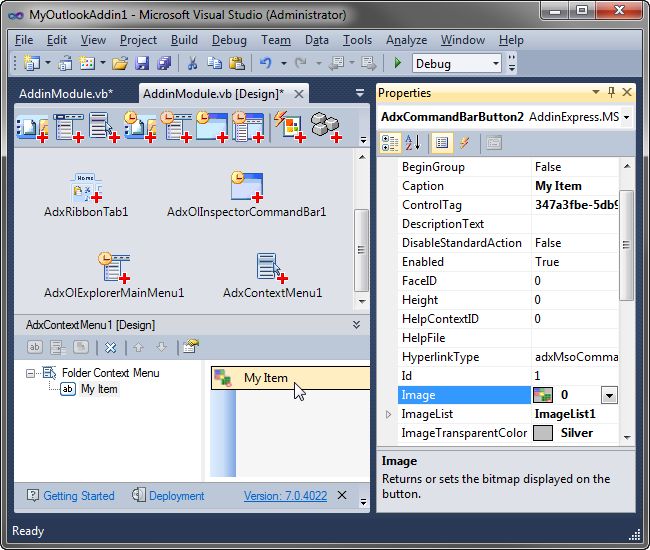
The sample Outlook plug-in described on this page adds a custom item to the Folder Context Menu command bar; that is the name of the context menu shown when you right-click a folder in the folder tree.
Context menus in Outlook 2010 are customizable with both ADXContextMenu (commandbar-based) and ADXRibbonContextMenu (Ribbon-based) components. Note that CommandBar-based context menu items cannot be positioned in the Ribbon-based context menus of Outlook 2010: a custom context menu item created with the ADXContextMenu component will always be shown below any built-in or custom context menu items in a Ribbon-based context menu. Only Ribbon-based context menus are supported in Outlook 2013 - 2024. The Add ADXRibbonContextMenu command in the Add-in Express Toolbox places a new ADXRibbonContextMenu component onto the add-in module.
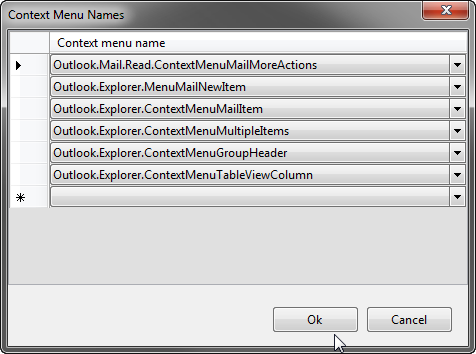
Then you set the Ribbons property that supplies context menu names for the ContextMenuNames property of the ADXRibbonContextMenu component. Finally, you use the ContextMenuNames property editor to choose the context menu(s) that will display your custom controls specified in the Controls property.
The screenshot below shows the editor window of the ContextMenuNames property. To get the context menu names displayed in the screenshot, you need to set the Ribbons property to OutlookMailRead;OutlookMailCompose;OutlookExplorer as shown in the screenshot above.
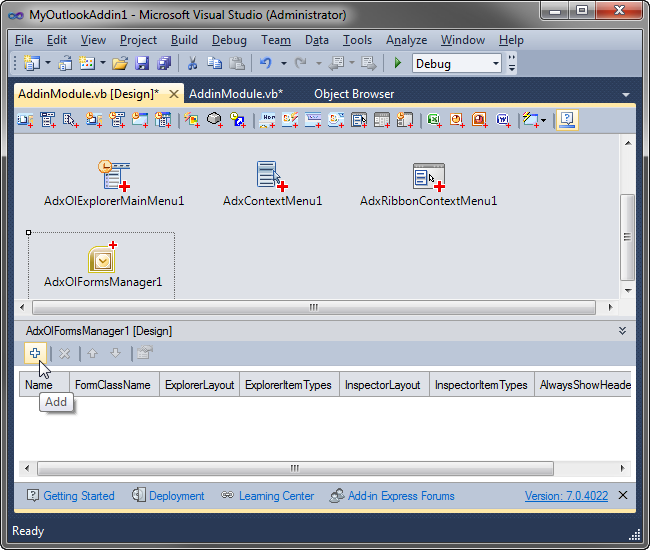
See also Command Bar UI components and Ribbon UI components. Step 10. Creating an advanced Outlook regionCreating a new Outlook region includes the following steps:
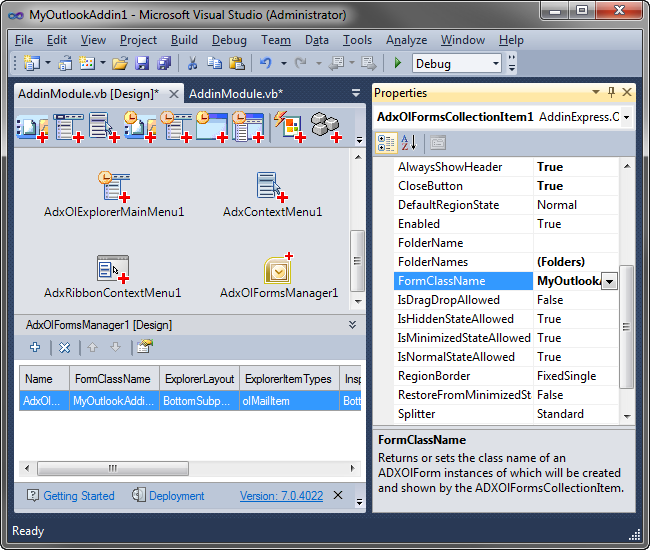
The item of the ADXOlFormsCollectionItem type provides properties for showing the form specified in the FormClassName property. For this sample project, the properties and their settings are as follows:
See also Advanced Outlook form and view regions. Step 11. Accessing Outlook objectsAdd the following method to the add-in module: The code of the GetSubject method emphasizes the following:
Now create the following event handlers for the CommandBar and Ribbon buttons added in previous steps: Step 12. Handling Outlook eventsThe Add-in Express Toolbox provides the Add Events command that creates (and deletes) event components providing application-level events.
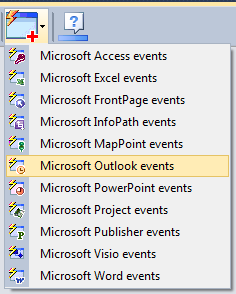
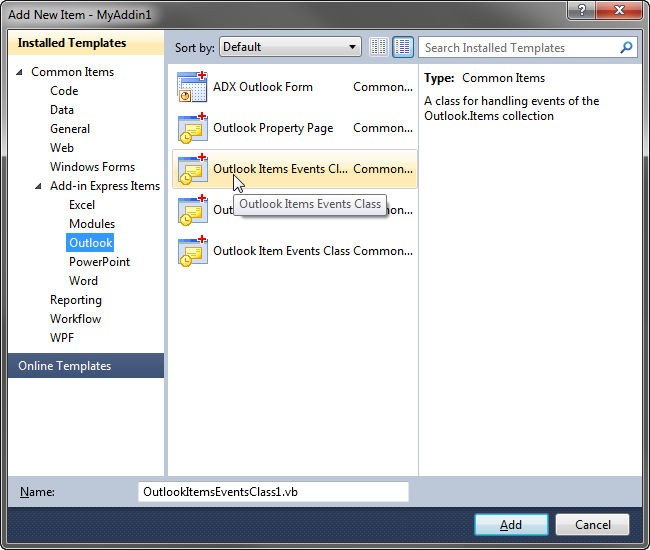
In this sample, we place the Outlook Events (ADXOutlookAppEvents) component onto the add-in module. With the Outlook Events component, you handle application-level events of Outlook. For instance, the following code handles the BeforeFolderSwitch event of the Outlook.Explorer class: If you create a label on the form added in Step 10. Creating an advanced Outlook region, you can modify the label in the ADXSelectionChange event of the form: See also Step 13. Handling events of the Outlook Items object and Events classes. Step 13. Handling events of Outlook Items objectThe Outlook MAPIFolder class provides the Items collection. This collection provides the following events: ItemAdd, ItemChange, and ItemRemove. To process these events, you use the Outlook Items Events Class item located in the Add New Item dialog.
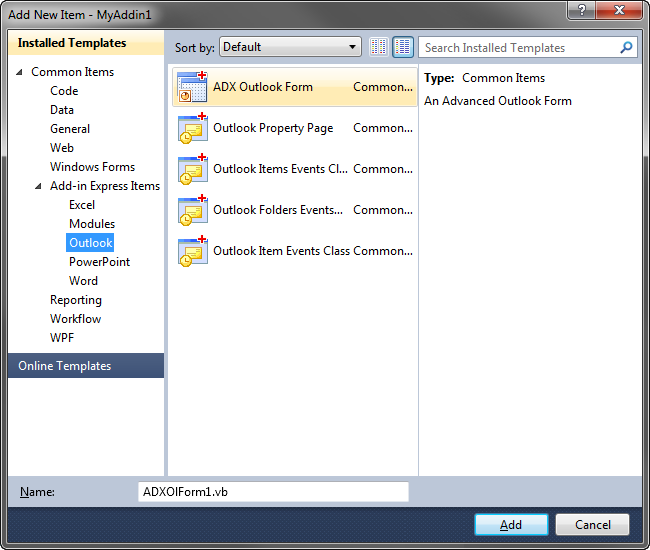
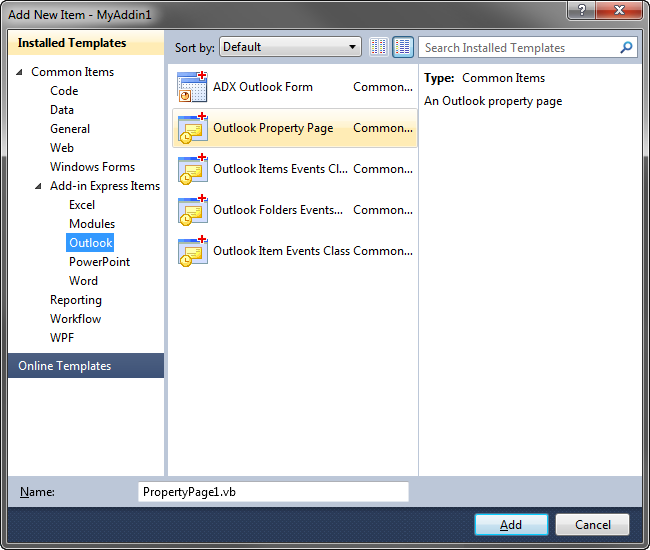
This adds the OutlookItemsEventsClass1.vb class to the add-in project. You handle the ItemAdd event by entering some code into the ItemAdd method of the class: To use this class, you have to add the following declarations and code to the add-in module: To process events of the Folders and Items classes as well as of all sorts of Outlook items, see Event classes. See also Outlook Item Events explained and Outlook Items and Folders Events explained. Step 14. Adding property pages to the folder properties dialogOutlook allows adding custom pages (tabs) to the Options dialog (the Tools | Options menu) as well as to the Properties dialog of any folder. To automate this task, Add-in Express provides the ADXOlPropertyPage component. You find it in the Add New Item dialog (see the screenshot below).
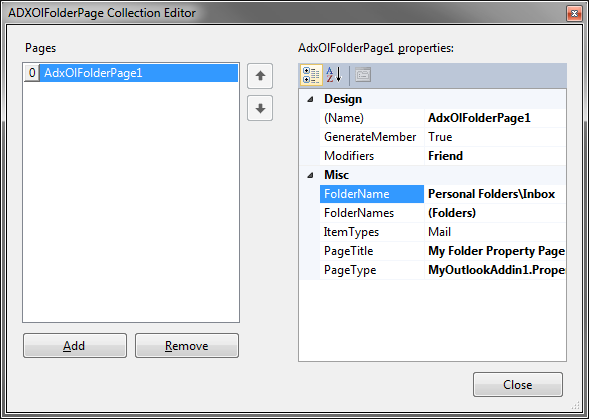
Click the Add button to add a descendant of the ADXOlPropertyPage class to your project. You can customize that page as an ordinary form: add controls and handle their events. To add a property page to the <folder name> Properties dialog box of an Outlook folder(s), you do the following:
The screenshot below shows the settings you need to display your page in the Folder Properties dialog for the Inbox folder.
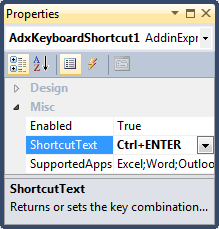
The path to the Inbox folder depends on the environment as well as on the Outlook localization. To take care of this, get the path to the Inbox folder at plug-in startup and assign it to the FolderName property of the Folder Page item. The code below gets the full folder name of the Inbox folder in the AddinStartupComplete event of the add-in module: See the code of the GetFolderPath function in FolderPath property is missing in Outlook 2000 and XP. Now add a check box to the property page. The code below handles the CheckedChanged event of the check box as well as the Dirty, Apply, and Load events of the property page: Finally, you add the following property to the add-in module: This sample project demonstrates adding a property page to the Folder Properties dialog of a given Outlook folder. To add a property page to the Tools | Options dialog box (Outlook 2000 - 2007), you use the PageType and PageTitle properties of the add-in module. In Outlook 2010 and higher, you open that dialog via File Tab | Options | Add-ins | Add-in Options. See also Outlook Property page. Step 15. Intercepting keyboard shortcutsTo intercept a keyboard shortcut, you use the Add Keyboard Shortcut command that puts an ADXKeyboardShortcut onto the add-in module. Choose or enter a key combination in the ShortcutText property of the component and handle its OnAction event .
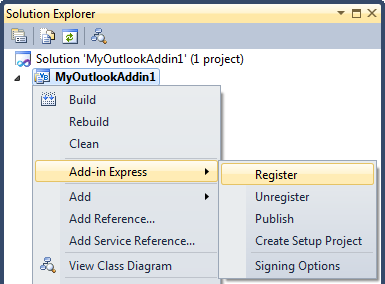
Intercepting keyboard shortcuts requires that you set the HandleShortcuts property of AddinModule to true. Step 16. Running Outlook add-inChoose Register Add-in Express Project in the Build menu. Alternatively, you can choose Add-in Express | Register in the context menu of your add-in project. See also If you use an Express edition of Visual Studio. Start the host application(s) and check if the add-in works. If the add-in isn't visible in the host application's UI, see Troubleshooting add-in loading.
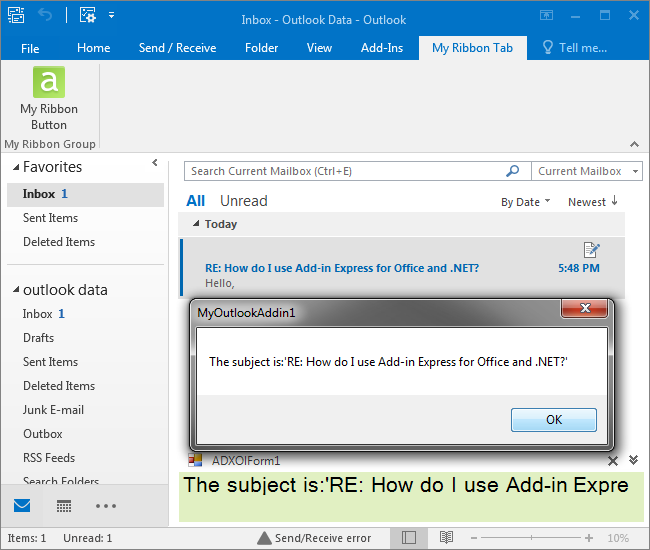
The new plug-in in the Outlook Explorer window:
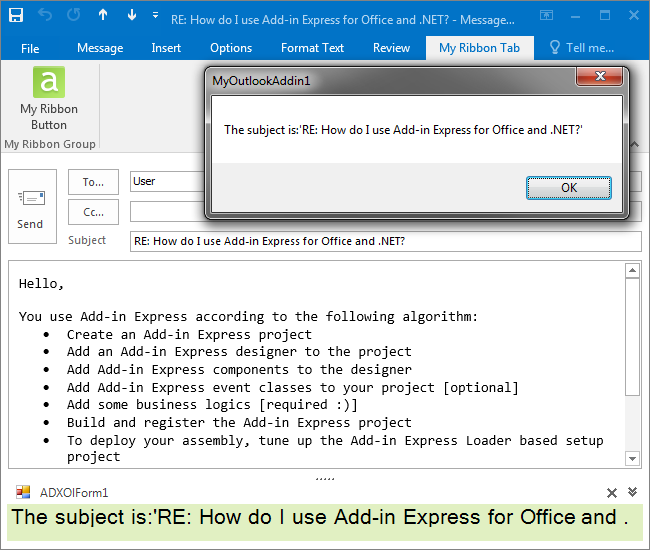
The new plug-in in the Outlook Inspector window:
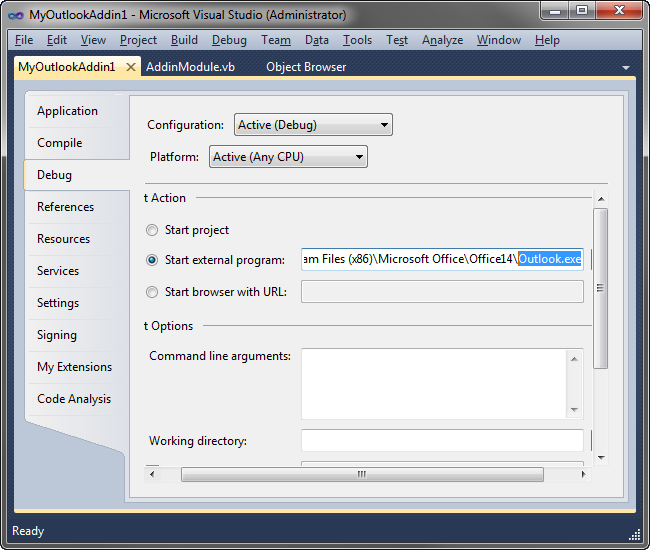
You can find your plug-in in the COM Add-ins dialog. Step 17. Debugging your Outlook plug-inTo debug your add-in, just specify the Outlook executable in Start External Program in the Project Options window and press F5.
Step 18. Deploying your Outlook pluginThe table below provides links to step-by-step instructions for deploying COM add-ins. Find background information in Deploying Office extensions. Table 2. Deploying COM add-ins: links to step-by-step instructions
What's next?You may check the following sections under Add-in Express tips and notes:
|

