Make Outlook addin / plug-in in Delphi.
Add a custom ribbon tab, region, menu.
|
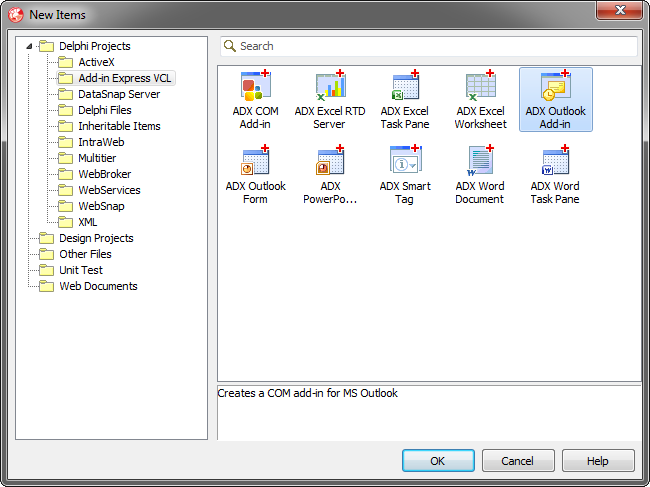
Add-in Express™ Add-in Express Home > Add-in Express for Office and Delphi VCL > Online Guide > Building Outlook plugins in Delphi Building Outlook add-ins in DelphiAdd-in Express allows building COM add-ins for Microsoft Outlook 2024- 2003 with a single code base. It provides the Outlook-specific add-in module and two Outlook-specific command bar components: TadxOlExplorerCommandBar and TadxOlInspectorCommandBar. The former adds a command bar to the Outlook Explorer window and solves many problems with custom Outlook command bars. The latter adds a command bar to the Outlook Inspector window. Both command bar components have the FolderName, FolderNames and ItemTypes properties that add context-sensitivity to Outlook command bars. The olExplorerItemTypes, olInspectorItemTypes, and olItemTypeAction properties add context-sensitivity to Outlook command bar controls. Additionally, the Add-in Express Outlook Add-in wizard allows creating property pages which will be shown in the Options (Tools | Options menu) and folder Properties dialogs. The sample project described below implements a COM add-in for Outlook. See also How to create an add-in for Excel, Word and PowerPoint. Step 1. Build an Outlook COM add-in projectMake sure that you have administrative permissions and run Delphi via the Run as Administrator command. To build an Outlook COM add-in project in the Delphi IDE, use the Outlook Add-in project template available in the New Items dialog:
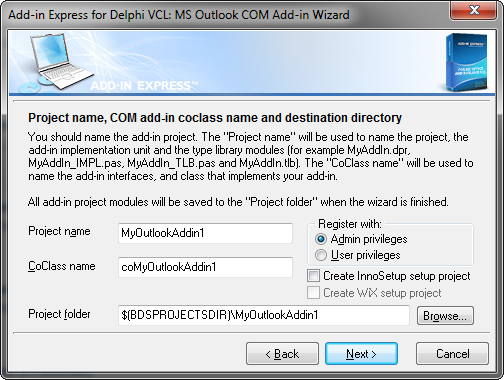
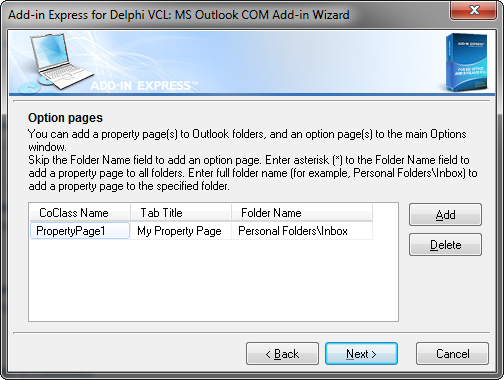
When you select the Outlook add-in template and click OK, the project wizard starts. In the wizard windows, you choose the project options, define task panes and option pages for your Outlook plugin.
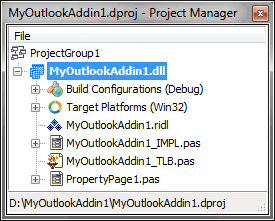
The wizard builds and opens a new Outlook COM add-in project in the Delphi IDE.
The add-in project includes the following items:
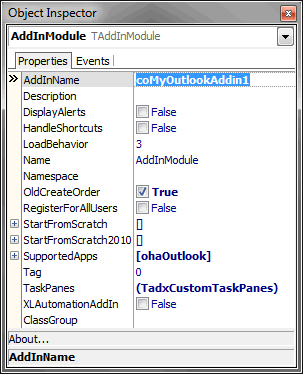
Step 2. COM Add-in moduleThe add-in module (MyOutlookAddin1_IMPL.pas and MyOutlookAddin1_IMPL.dfm) is the core part of the COM add-in project. It is a container for Add-in Express components. You specify the add-in properties in the module's properties, add the required components to the module's designer, and write the functional code of your add-in in this module. The code for MyAddin1_IMPL.pas is as follows: The add-in module contains two classes: the "interfaced" class (TcoMyOutlookAddin1 in this case) and the add-in module class (TAddInModule). The "interfaced" class is a descendant of the TadxAddIn class that implements the IDTExtensibility2 interface required by the COM Add-in architecture. Usually, you don't need to change anything in the TadxAddIn class. The add-in module class implements the add-in functionality. It is an analogue of the Data Module, but unlike the Data Module, the add-in module allows you to set all properties of your Outlook add-in, handle its events, and create toolbars and controls. Step 3. Add-in Express COM Add-in designerFirst off, you can drop a component from the Tool Palette onto the designer of the Outlook add-in module. Also, the module designer allows setting add-in properties. The most important are the name of your add-in (AddInName) and how it loads into the host application (LoadBehavior). The typical value of the LoadBehavior property is 3, which means Loaded and Connected.
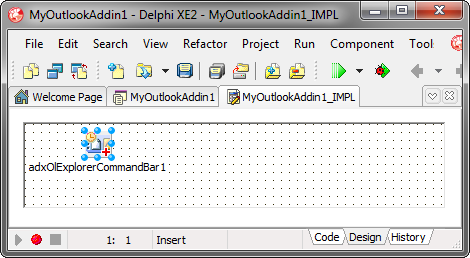
Step 4. Add a new Explorer CommandBarTo add a command bar to the Outlook Explorer window, use the TadxOlExplorerCommandBar component from the Add-in Express group in the Tool Palette.
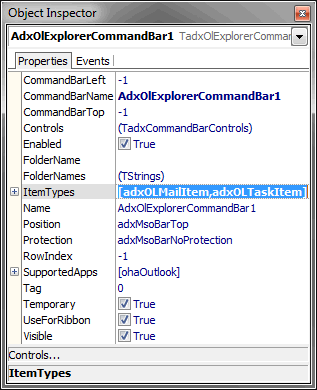
Select the Add-in Express Outlook Explorer Command Bar component, and, in the Object Inspector window, specify the commandbar name using the CommandBarName property and choose its position. Outlook-specific versions of the Command Bar component provides context-sensitive properties. They are FolderName, FolderNames, and ItemTypes (see Command bar visibility rules).
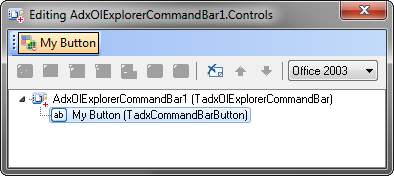
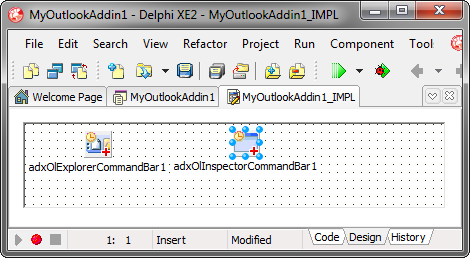
In the screenshot, you can see the Outlook Explorer command bar component that will create the command bar named AdxOlExplorerCommandBar1. The command bar will be shown for every Outlook folder (FolderName = ''), the default item types of which are Mail or Task. Step 5. Add a new CommandBar button to the Outlook add-inYou run the property editor for the Controls property in the Object Inspector. The editor allows adding command bar controls in an intuitive way.
Add a button to the toolbar, specify the Caption and set Style to adxMsoButtonIconAndCaption. To handle the Click event, in the Object Inspector window, switch to Events and add a Click event handler. Step 6. Access Outlook objectsAdd-in Express provides the OutlookApp property of the TOutlookApplication type for Outlook add-ins. This allows you to write the following code to the Click event of the newly added button. The code of the GetSubject method emphasizes the following:
Step 7. Handle Outlook eventsAdd-in Express provides several components that make host's events available for the add-in module. To add Outlook events to the add-in, find the TadxOutlookAppEvents component in the Tool Palette and drag-n-drop it onto the module. You can use the component to get access to the events of all Outlook versions. If both TAddInModule and TadxOutlookAppEvents provide the same event, you should use the event provided by TAddInModule. For instance, both TAddInModule and TadxOutlookAppEvents provide the BeforeFolderSwitch event. According to the rule, we choose the event provided by the add-in module and write the following code: Step 8. Add a new Inspector CommandBarConsidering the specificity of Outlook, Add-in Express provide a special command bar component, TadxOlInspectorCommandBar, that offers the same capabilities as its Explorer counterpart: it adds custom command bars or connects to built-in ones in the Outlook Inspector windows. The component adds context-sensitivity to your command bars through the FolderName(s) and ItemTypes properties.
We use the default settings of the component in this sample. You should populate an Inspector command bar with controls the way it's described in Step 5. Adding a new command bar button. Add a button to the command bar and display the subject of the currently open item using the following code that handles the Click event of the button: Note. To display an Inspector command bar in Office 2007 and Office 2010 you must explicitly set the UseForRibbon property of the command bar component to True. Step 9. Customize Outlook menu barOutlook 2000-2003 provides two main menu types for corresponding Outlook windows: Explorer and Inspector. Accordingly, Add-in Express provides two main menu components: Explorer Main Menu component and Inspector Main Menu component (note the Ribbon UI replaces the main menu of Inspector windows in Outlook 2007 and all main menus in Outlook 2010 - 2024). You add them using the context menu of the add-in module. Then you use the visual designer provided for the Controls property of the component.
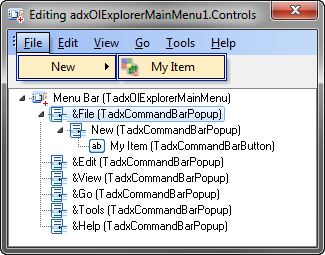
For example, to add a custom control to the popup shown by the File | New item in all Outlook Explorer windows, you do the following:
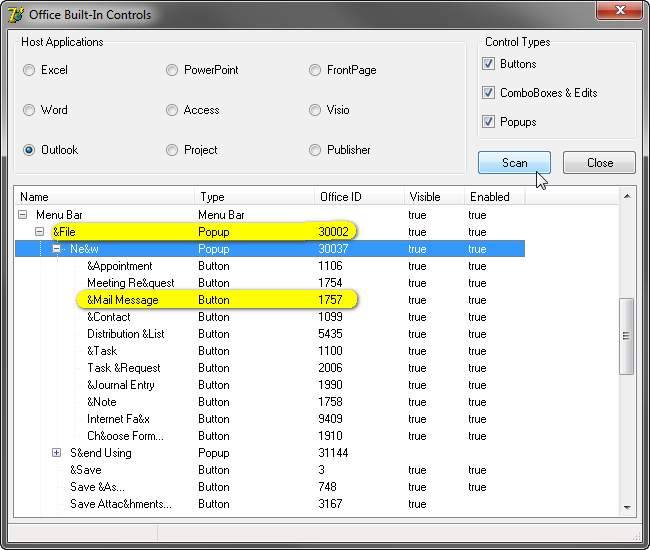
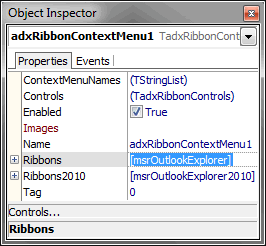
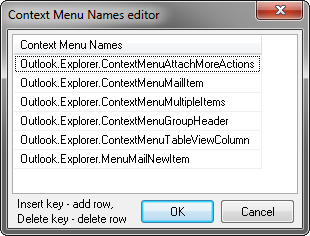
In the sample add-in described here, the BeforeId property of the My Item button is set to 1757, which is the ID of the Mail Message item. In this way, we position our item before Mail Message. See also Using built-in command bar controls. Step 10. Customize Outlook context menusYou customize Outlook context menus via the Context Menu component of Add-in Express. You use the context menu of the add-in module to add such a component onto the module. Then you choose Outlook in the SupportedApp property of the component. Then, in the CommanBarName property, you choose the context menu you want to customize. Finally, you add custom controls in the visual designer supplied for the Controls property. The sample add-in described on this page adds a custom item to the Folder Context Menu command bar that implements the context menu which is shown when you right-click a folder in the folder tree. Note. Outlook 2000 context menus are not customizable. Also, you can customize many Ribbon-based context menus in Outlook 2010 - 2024. Find the TadxRibbonContextMenu component on the Tool Palette and drop it on the add-in module. The component allows specifying Ribbons that supply context menu names for the ContextMenuNames property. You use the ContextMenuNames property editor to choose the context menu(s) that will display your custom controls specified in the Controls property.
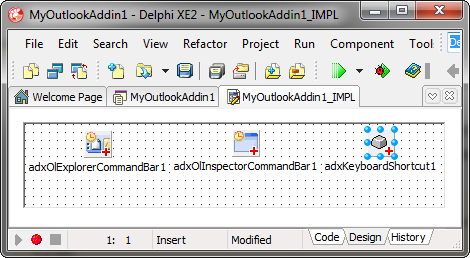
Step 11. Handle events of Outlook Items objectThe Outlook 2000 unit provides the TItems component (of the TOleServer type). This component provides the following events: OnItemAdd, OnItemChange, and OnItemRemove. To process these events, you add the following stuff to the Add-in Module: Step 12. Add folder property pagesOutlook allows you to add custom option pages to the Options dialog box (the Tools | Options menu) and / or to the Properties dialog box of any folder. To automate this task, the Add-in Express wizard provides you with the Option Pages window (see Step 1. Building an Outlook COM add-in project). By default, an option page contains two controls only: a label and an edit box. The edit box shows how to handle the OnChange event and update the corresponding option page. You add the TCheckBox component to the Property page, handle its OnClick event following the code template above, and connect or disconnect the TItems component in the Apply method. You initialize the check box in the Initialize method of the property page: Step 13. Intercept keyboard shortcutTo intercept a keyboard shortcut, you add an ADXKeyboardShortcut component to the COM Add-in Module using the Add Keyboard Shortcut command of the module.
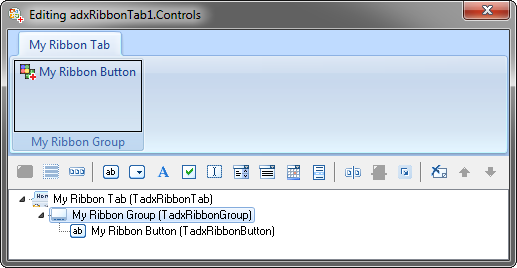
In the Object Inspector window you select (or enter) the desired shortcut in the ShortcutText property. We chose the shortcut for the Send button in the mail Inspector's Standard command bar. It is Ctrl+Enter. To use keyboard shortcuts, set the HandleShortcuts property of the add-in module to true. Step 14. Customize the Outlook Ribbon user interfaceTo add a new tab to the Outlook Ribbon, you add the TadxRibbonTab component to the module. Then, in the Object Inspector window, run the editor for the Controls collection of the Ribbon tab component. In the editor, use the toolbar buttons or context menu to add or delete Add-in Express components that form the Ribbon interface of your add-in. First, you add a Ribbon tab and change its caption to My Ribbon Tab. Then, you select the tab component, add a Ribbon group, and change its caption to My Ribbon Group. Next, you select the group, and add a button. Set the button caption to My Ribbon Button. Use the Glyph property to set the icon for the button.
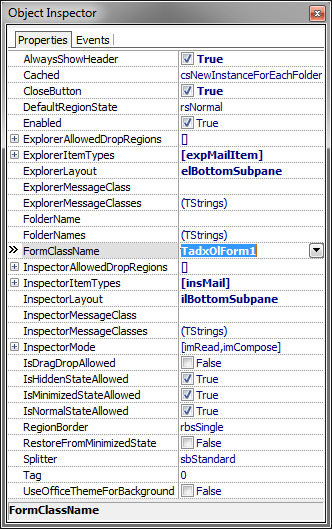
Now add the event handler to the Click event of the button. Write the following code: Remember, the TadxRibbonTab Controls editor perform the XML-schema validation automatically, so from time to time you will run into the situation when you cannot add a control to some Ribbon level. It is a restriction of the Ribbon XML-schema. Unlike other Ribbon-based applications, Outlook has numerous ribbons. Please use the Ribbons property of your TadxRibbonTab components to specify the ribbons you customize with your tabs. Step 15. Add advanced Outlook regionsYou add an Outlook Forms Manager component (TadxOlFormsManager) to your add-in module and an Add-in Express Outlook Form to your project using the New Items dialog. Then you add an item to the Items collection of the manager and specify the following properties:
On the form, you add a label and handle, say, the OnADXSelectionChange event of the form:
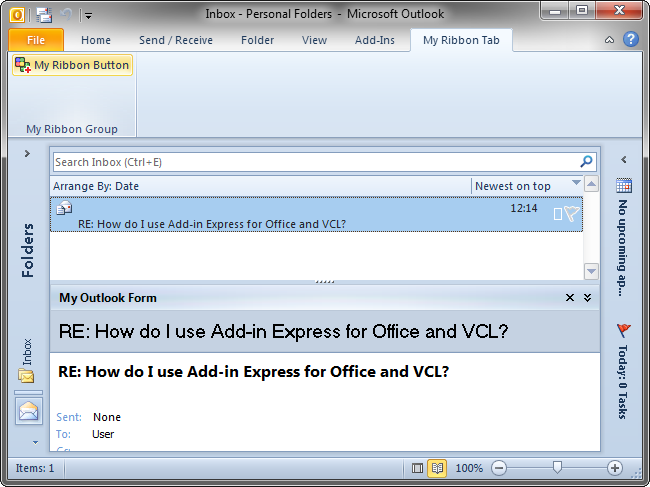
The GetSubject method above retrieves the subject of the e-mail currently open in the Outlook Inspector window or the one selected in the current Explorer window. Read more about creating custom task panes. Step 16. Run the Outlook add-inSave the add-in project, compile it, close Outlook, and register the add-in using the Run | Register ActiveX Server menu item. Run Outlook and find your option page, command bars, and controls. You find your add-in in the COM Add-ins dialog. A custom ribbon tab and a form in the Outlook 2010 Explorer window:
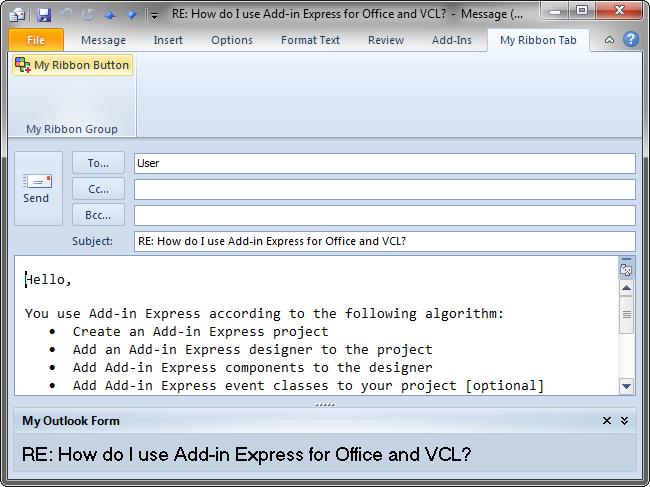
A custom ribbon tab and a form in the Outlook 2010 Inspector window:
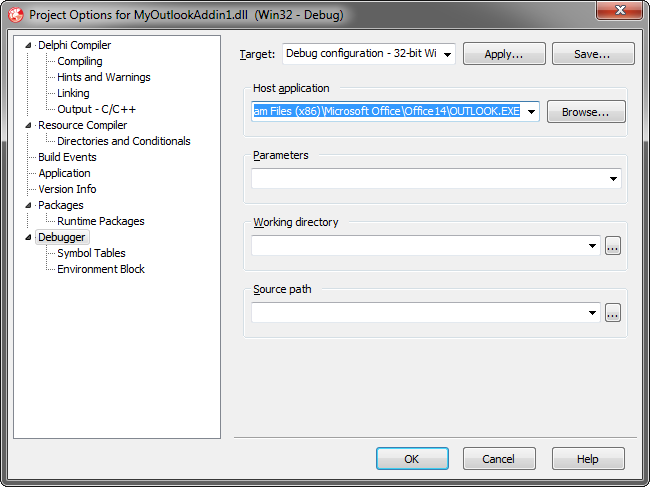
Step 17. Debugging the Outlook add-inTo debug your add-in, specify the add-in's host application in the Host Application field in the Project Options window.
To debug your add-in in 64-bit versions of Outlook, you have to register the add-in DLL using regsvr32; run it from an elevated 64-bit Command Prompt. In addition, you must explicitly specify to run Outlook 64-bit in the dialog window shown above. Step 18. Deploying the Outlook add-inMake sure your setup project registers the add-in DLL. Say, in Inno Setup projects you use the 'regserver' command. |
