How to create a web setup project using WiX
Designer for WiX Toolset
Add-in Express Home > Designer for WiX toolset > Online Guide > Creating a web setup project
Creating a web setup project
Here we demonstrate how to create a standard setup project for a web application.
Make sure WiX Toolset is installed on your machine and registered with your Visual Studio. If WiX is not listed in the About dialog of Visual Studio, install the WiX version supporting the Visual Studio version that you use.
Step 1. Adding a WiX setup project
In Visual Studio, open your solution and add a WiX project to it: go to the Visual Studio main menu and click File -> Add -> New Project to open the Add New Project dialog.

Choose the Setup Project item in the Windows Installer XML node, specify the project name and click OK.
Visual Studio will add the setup project to the solution and open the Product.wxs file.
Step 2. Setup project file
Product.wxs is the source file of your setup project. A newly created project contains the XML code shown below.
<?xml version="1.0" encoding="UTF-8"?>
<Wix xmlns="http://schemas.microsoft.com/wix/2006/wi">
    <Product Id="*" Name="SetupProject1" Language="1033" Version="1.0.0.0"
		Manufacturer="" UpgradeCode="aa918e08-bbdd-49fc-a9f2-fef05b153069">

		<Package InstallerVersion="200" Compressed="yes" InstallScope="perMachine" />

        <MajorUpgrade
		DowngradeErrorMessage="A newer version of [ProductName] is already installed." />
        <MediaTemplate />

        <Feature Id="ProductFeature" Title="SetupProject1" Level="1">
            <ComponentGroupRef Id="ProductComponents" />
        </Feature>
    </Product>

    <Fragment>
        <Directory Id="TARGETDIR" Name="SourceDir">
            <Directory Id="ProgramFilesFolder">
                <Directory Id="INSTALLFOLDER" Name="SetupProject1" />
            </Directory>
        </Directory>
    </Fragment>

    <Fragment>
        <ComponentGroup Id="ProductComponents" Directory="INSTALLFOLDER">
            <!-- TODO: Remove the comments around this Component element and -->
			<!-- the ComponentRef below in order to add resources to this installer. -->
            <!-- <Component Id="ProductComponent"> -->
            <!-- TODO: Insert files, registry keys, and other resources here. -->
            <!-- </Component> -->
        </ComponentGroup>
    </Fragment>
</Wix>
We suggest that you modify the file as described below.
As you can see in the code fragment above, the Manufacturer attribute is empty. When checking your project, the WiX schema will generate an error message so you may want to set this attribute right now.
Pay attention to the MediaTemplate tag: by adding the EmbedCab="yes" attribute, you create a single .MSI file as opposed to getting a CAB file along with the .MSI.
Step 3. Specifying the target folder
TARGETDIR is a special Windows Installer property that specifies the root destination directory to which the installer delivers the installation files on the target machine. In fact, TARGETDIR is the main entity of the Windows Installer architecture. To specify it, you open the File System Editor.

Note. WiX pre-creates two folder entries: Application Folder and Program Files Folder. You need to delete the Program Files Folder entry.

Now convert the Application Folder item to Web Application Folder:

And now, set the properties of the Web Application Folder as required.

Step 4. Web application project outputs
Add the Content Files project output to the Web Application Folder:

Add the Primary Output to the bin subfolder of the Web Application Folder:

In the current version of the WiX Designer, adding the Primary Output doesn't add dependency assemblies required by the application. You need to add such assemblies manually. Adding an assembly belonging to the .NET Framework version / edition that you currently use is not required.
Step 5. Creating a folder hierarchy and deploying files
You use the File System Editor to specify how and where to create folders and files required for your application.

To refer to a system folder such as User's Program Menu or Global Assembly Cache Folder, right-click the File System on Target Machine node and choose Add Special Folder from the context menu:

Step 6. Creating registry entries
You use the Registry Editor to create new and modify existing registry keys and values required for your program.

Step 7. Creating the installer UI
WiX Designer provides a number of pre-created dialogs that you use to provide the UI of the installer. If you need your installer to support multiple languages, see How to localize the setup project.
Open the User Interface Editor and add required dialogs.

 to add.")

Step 8. Specifying custom actions
Use the Custom Actions Editor to specify custom actions for your web setup project.
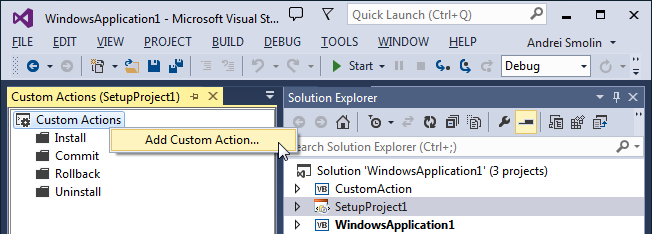
In the screenshot below, the Primary Output of the CustomAction project is already added to the bin subfolder:

