How to create a multi-language MSI setup package using WiX
Designer for WiX Toolset
Add-in Express Home > Designer for WiX toolset > Online Guide > Multi-language setup projects
Multi-language setup projects
This page provides the detailed guidance on how to create a multi-lingual installer (.msi package) using WIX. It's highly recommended to create a copy of your setup project before performing the following steps.
Localizing the setup project: quick start
The UI forms of your setup project use text strings that WiX Designer combines into language-specific sets of strings. Localizing means specifying what language(s) to use in the UI forms of your setup project.
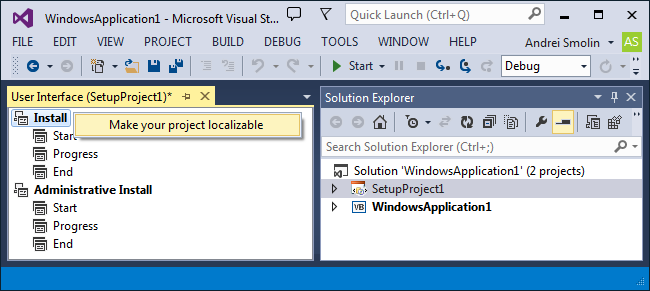
In the Solution Explorer, right-click the setup project and choose View WiX Editors | User Interface Editor.

In the User Interface Editor, right-click the Install or Administrative Install entry and choose Make project localizable in the context menu. Note, this command is disabled if any form is added to the UI editor. To get it enabled, you must delete all forms.
The most obvious result of selecting this command is the language files (.WXL) added to the setup project:
 are added to the setup project.")
There are at least two .WXL files:
- StandardUI_neutral.wxl – a set of language-independent text strings; it is used when the installer supporting a given set of languages starts on a machine where none of the languages is supported.
- StandardUI_{language identifier}-{country identifier}.wxl – a set of language-dependent text strings; it is used when the installer supporting a given set of languages starts on a machine where the language identified using the combination of {language identifier} and {country identifier} is installed.
 of the selected languages are added to the setup project.")

When a multi-language setup project is built, you will see the following folder structure in the project's output folder:

The language-specific folders contain .MSI files built for the corresponding language. They are used to build the resulting .MSI; it supports all of the specified languages.
Behind the scenes
Choosing the Make project localizable command and specifying the supported languages modifies the WiX as follows:
<!-- Before: -->
<Product Language="1033" > Other attributes skipped -->
    <Package /> <!-- Attributes skipped -->
    <!-- Other tags skipped -->
</Product>

<!-- After: -->
<Product Language="!(loc.ID)"> <!-- Other attributes skipped -->
    <Package Languages="1029,1031,1033,1049,3072" /> <!-- Other attributes skipped -->
    <!-- Other tags skipped -->
</Product>
This modification of the Language attribute also modifies the meaning of the setup project's Localization property. Before the Make project localizable command is chosen, the Localizable property lets you specify what language to use for the installer's UI and prerequisites. After choosing this command, the Localizable property allows choosing the current language for the user interface at design time (while you create the setup project); at the same time this property specifies the language used for the prerequisites at run time (when the installer created using this setup project is run).
Supported and non-supported languages
The Designer for WiX toolset includes the localized versions of all UI dialogues (text strings) for 14 languages, including English, German, French, Italian, Spanish, Russian, Chinese, Japanese, etc. We call such languages supported by default.
The text strings are bundled to a language-specific file (.WXL), which is then added to the setup project. In the Languages property, we mark supported languages with an asterisk. For example, the screenshot shows that of all the Chinese languages listed, only the following two are supported by default:
- Chinese (Simplified, PRC)
- Chinese (Traditional, Taiwan)

All other languages aren't supported by default. Choosing a non-supported language adds a file containing text strings from the language-neutral (English) set of text strings. However, you can easily localize your setup package in any language you want. Just select a desired language in the project property, and translate the predefined English strings into that language.
Editing language-specific files
You can open a language-specific .WXL file in any text editor to edit it. Alternatively, you can edit the text strings available for a given UI form in the Properties window: use the Localization property to choose a language selected using the Languages property.


Testing multiple-language installer
You can start your .MSI for a specific language using this command line:
Msiexec.exe /i MyInstaller.MSI TRANSFORMS=":{language identifier}"
You take a value for the {language identifier} above form the Languages attribute (see the Package tag in Product.wxs), for example 1033.
Another way is to set the required language using the Format drop down on the Region and Language dialog (see Control Panel) and then start the MSI.

Language-specific prerequisites
The language that you specify using the Localization property is also used for the prerequisites if they are specified in your project. If you need to have language-specific prerequisites, see (google for) section Building Installation Package Bundles in the WiX manual.
How to prevent running Install and Uninstall custom actions during upgrade
To prevent running an Install custom action when the product is being upgraded, you can specify the following criteria in the Condition property of the custom action:
NOT (Installed OR OLDPRODUCTFOUND)
The Installed property is described here. As to the OLDPRODUCTFOUND property, you need to define it yourself. Here's an example:
<Upgrade Id="{%YOURGUID%}">
    <UpgradeVersion
		Minimum="1.12.0"
		Property="NEWPRODUCTFOUND"
		OnlyDetect="yes"
		IncludeMinimum="no"
		Language="1033" />
    <UpgradeVersion
		Maximum="1.12.0"
		Property="OLDPRODUCTFOUND"
		OnlyDetect="no"
		IncludeMinimum="yes"
		IncludeMaximum="no"
		Language="1033" />
</Upgrade>
To prevent running an Uninstall custom action when the program is upgraded, you specify the following criteria in the Condition property of the custom action:
NOT UPGRADINGPRODUCTCODE
The UPGRADINGPRODUCTCODE property is described here.