How to add custom button, checkbox, combo box, image, tree-view.
Customize Outlook toolbar in .NET with your controls.
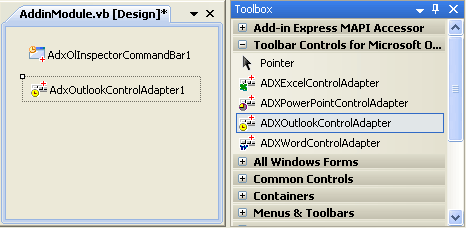
Toolbar Controls
for Microsoft® Office

Add-in Express Home > Toolbar Controls for Microsoft Office > Online Guide > Adding controls to Outlook toolbar

Create advanced command bar controls for Outlook

This sample demonstrates features described in Custom Toolbar Controls.

Just follow the first three steps described in Developing Microsoft Outlook add-ins sample. Add an ADXOlInspectorCommandBar to the add-in module (see Step 7. Adding a new Inspector toolbar of the same sample). Now set adxMsoBarBottom to the Position property of the added command bar. This sample is written in VB.NET, but you can develop your Outlook controls in C# and C++

1. Add an Outlook Control Adapter

Custom Toolbar Controls supports Office applications through special components that we call control adapters. You can find them on the Toolbar Controls for Microsoft Office tab in the Toolbox.

The first step in using non-Office controls in your add-in is adding the corresponding control adapter to your add-in module. In this case, we use an ADXOutlookControlAdapter.

Adding a control adapter

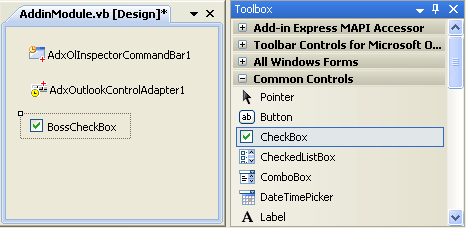
2. Add your custom control to Outlook toolbar

The add-in module can contain any components including controls. Therefore, you can add a check box (BossCheckBox) directly to your add-in module and customize the checkbox in any way you like.

Adding a control

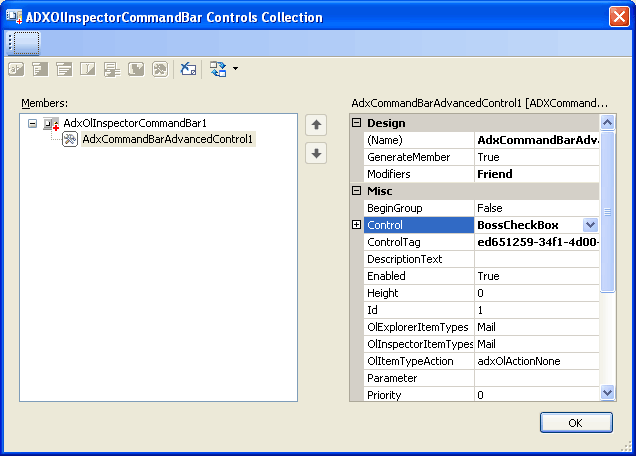
Then, you can customize the checkbox. For example, like this:

3. Handle your control events

To BCC a message to your boss you need to handle the checkbox. We usually use the following code to BCC messages to our boss. Please note we do not touch Outlook programming here.

VB.NET:


Private Sub BossCheckbox_CheckedChanged(ByVal sender As System.Object, ByVal e As System.EventArgs)
   If OutlookApp IsNot Nothing Then
      Dim Inspector As Outlook.Inspector = OutlookApp.ActiveInspector
      Dim Item As Outlook.MailItem = CType(Inspector.CurrentItem, Outlook.MailItem)
      If Not Item.Sent Then
         Dim ActualCheckBox As System.Windows.Forms.CheckBox = sender
         If ActualCheckBox.Checked Then
            Item.BCC = "myboss@mydomain.com"
         Else
            Item.BCC = ""
         End If
      End If
      Marshal.ReleaseComObject(Item)
      Marshal.ReleaseComObject(Inspector)
   End If
End Sub

4. Bind your control to Outlook commandbar

To bind BossCheckBox to the Outlook toolbar, you add an advanced command bar control (ADXCommandBarAdvancedControl1) to the Controls collection of your Outlook Inspector toolbar and select BossCheckBox in the Control property of the ADXCommandBarAdvancedControl1. That's all.

Binding your control to a command bar

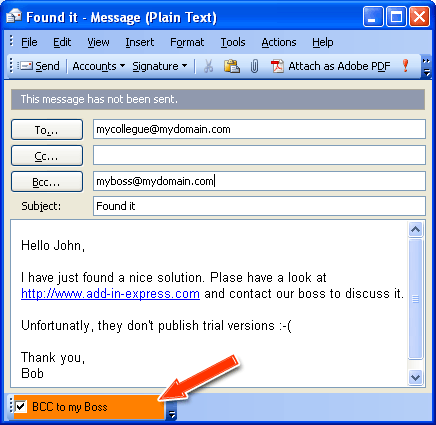
You have done all necessary steps to place your checkbox on your Outlook commandbar. Below we give the complete code of the InitializeComponent method of our add-in module:

VB.NET


Private Sub InitializeComponent()
Me.components = New System.ComponentModel.Container
Me.AdxOutlookControlAdapter1 = New _

AddinExpress.ToolbarControls.ADXOutlookControlAdapter(Me.components)
Me.AdxOlInspectorCommandBar1 = _
      New AddinExpress.MSO.ADXOlInspectorCommandBar(Me.components)
Me.BossCheckbox = New System.Windows.Forms.CheckBox
Me.AdxCommandBarAdvancedControl1 = _
      New AddinExpress.MSO.ADXCommandBarAdvancedControl(Me.components)
'
'AdxOlInspectorCommandBar1
Me.AdxOlInspectorCommandBar1.CommandBarName = _
      "AdxOlInspectorCommandBar1"
Me.AdxOlInspectorCommandBar1.CommandBarTag = _
      "6e212933-5790-40f5-8c25-4dd46c632f91"
Me.AdxOlInspectorCommandBar1.Controls.Add( _
       Me.AdxCommandBarAdvancedControl1)
Me.AdxOlInspectorCommandBar1.Position = _
      AddinExpress.MSO.ADXMsoBarPosition.adxMsoBarBottom
Me.AdxOlInspectorCommandBar1.Temporary = True
Me.AdxOlInspectorCommandBar1.UpdateCounter = 27
'
'BossCheckbox
Me.BossCheckbox.BackColor = _
      System.Drawing.Color.FromArgb(CType(CType(255, Byte), Integer), _
      CType(CType(128, Byte), Integer), CType(CType(0, Byte), Integer))
Me.BossCheckbox.Location = New System.Drawing.Point(0, 0)
Me.BossCheckbox.Name = "BossCheckbox"
Me.BossCheckbox.Size = New System.Drawing.Size(150, 24)
Me.BossCheckbox.TabIndex = 0
Me.BossCheckbox.Text = "BCC to my Boss"
Me.BossCheckbox.UseVisualStyleBackColor = False
'
'AdxCommandBarAdvancedControl1
Me.AdxCommandBarAdvancedControl1.Control = Me.BossCheckbox
Me.AdxCommandBarAdvancedControl1.ControlTag = _
           "f9a07d50-6dce-41b1-911e-68d694f7d7eb"
Me.AdxCommandBarAdvancedControl1.Temporary = True
Me.AdxCommandBarAdvancedControl1.UpdateCounter = 1
'
'AddinModule
Me.AddinName = "MyAddin"
Me.ShimProgID = "MyAddinShim.Proxy"
Me.SupportedApps = AddinExpress.MSO.ADXOfficeHostApp.ohaOutlook
End Sub

5. Register and run your add-in

inally, you can rebuild the add-in project, run Outlook, and find your check box:

Running the add-in

That's it! You may also want to have a look at another sample project showing how to add a custom control (DateTimePicker) to Outlook toolbar.